I spent a couple of months this summer building an aquarium from scratch. Along the way, I picked up a ton of new crafting, tools, and DIY skills.
This post is divided up into four parts:
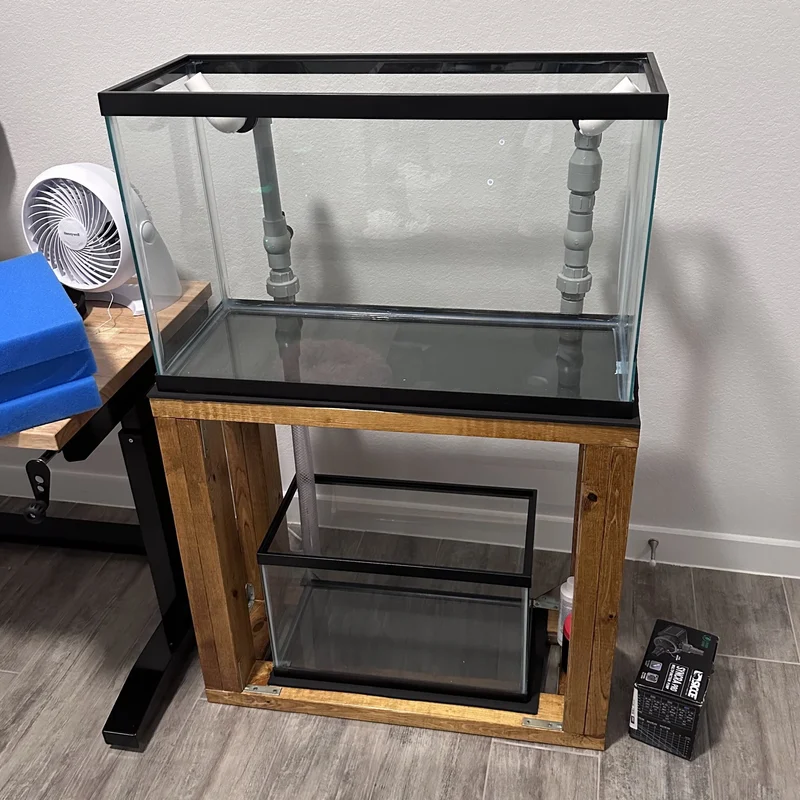
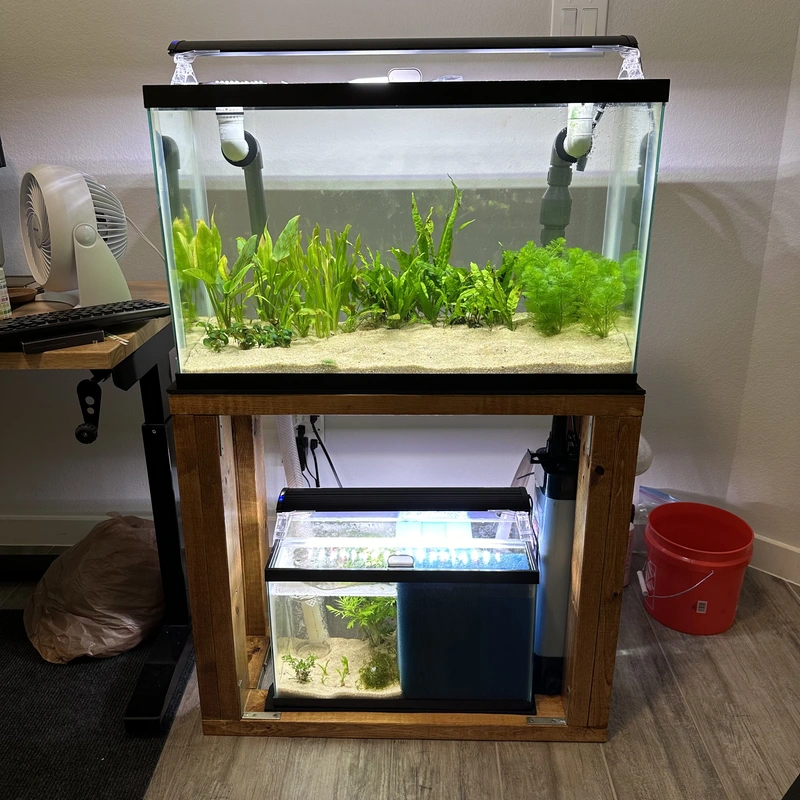
This project kicked off in early June, after I had just moved to a place where I’m able to keep fish again. I bought a 29 gallon display tank and a 10 gallon to serve as a sump tank. I didn’t pick this tank size for any water quality reasons. Tank dimensions are a factor for species spatial requirements but gallonage rules are otherwise a dilution strategy. Water quality is ultimately determined by the amount of food you put into a tank against filtration, number of plants, and water change frequency.
At the store, I looked at some pre-built stands at the store in the $200 range, but I’ve been wanting to learn some woodworking for the first time, so I opted to build one myself.
One of the first things I learned speedrunning woodworking concepts is that structures should be built to “path” weight straight into the ground, i.e. it’s ideal to not rely on screws bearing load alone if possible. Lumber sizes are given nominally, essentially meaning the sizes they are sold as are not the same as their actual sizes. For example, a 2x4 (“two by four”) is not actually 2x4” but instead 1.5x3.5”.
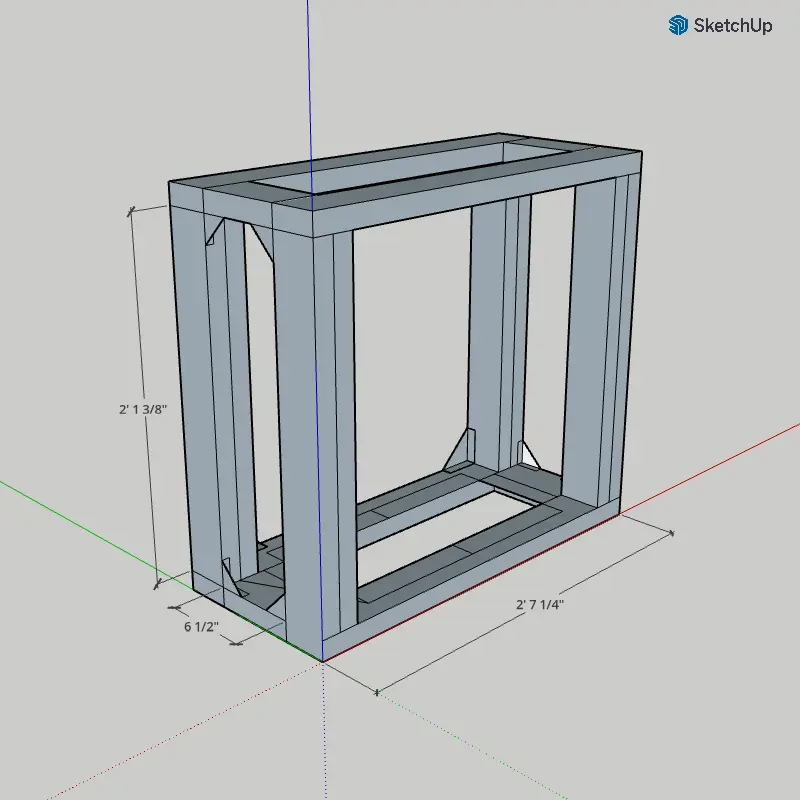
With these in mind I went and put together a basic model.
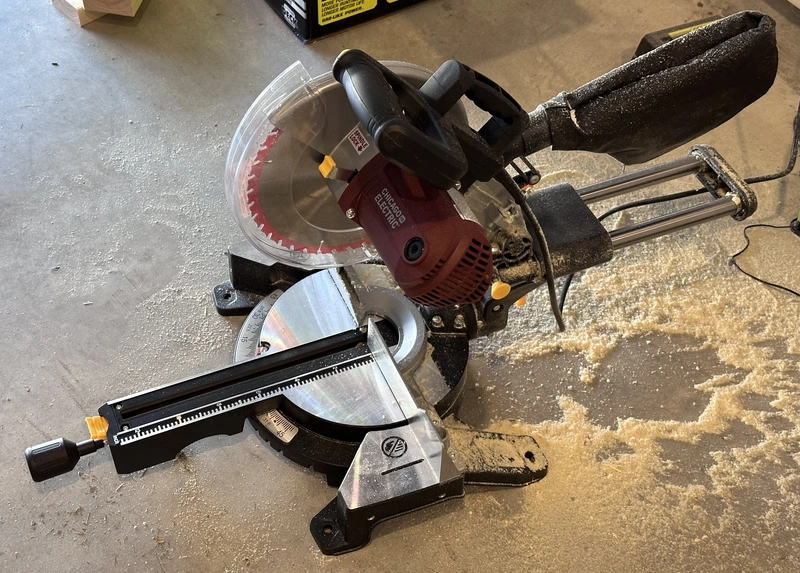
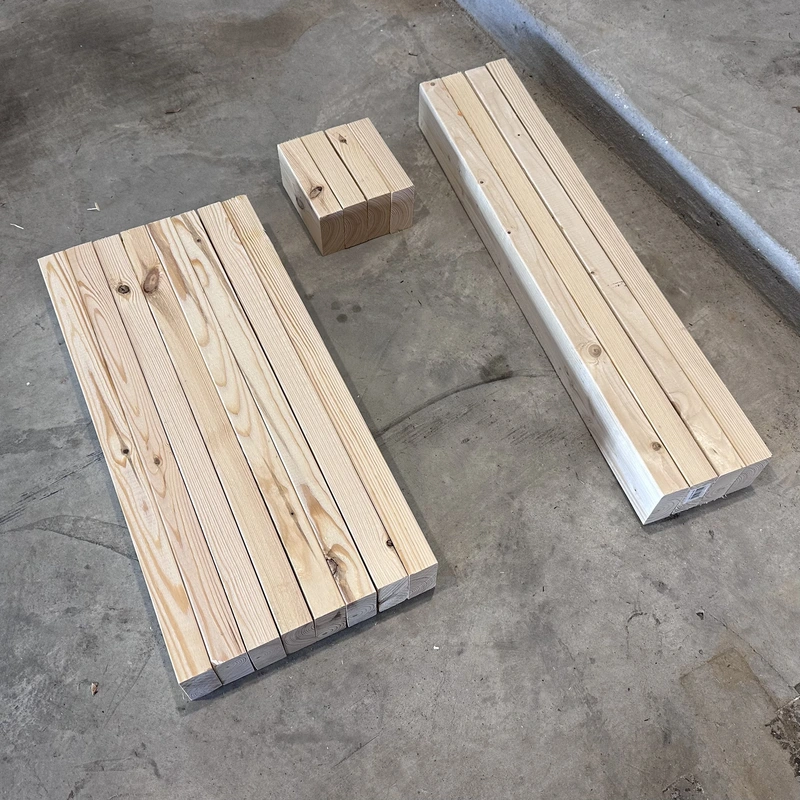
After picking up some lumber, I started cutting it down. I only used my miter saw once before, but I got acceptable cuts by saving one “master” length as a guide to align my blade to make subsequent lengths.
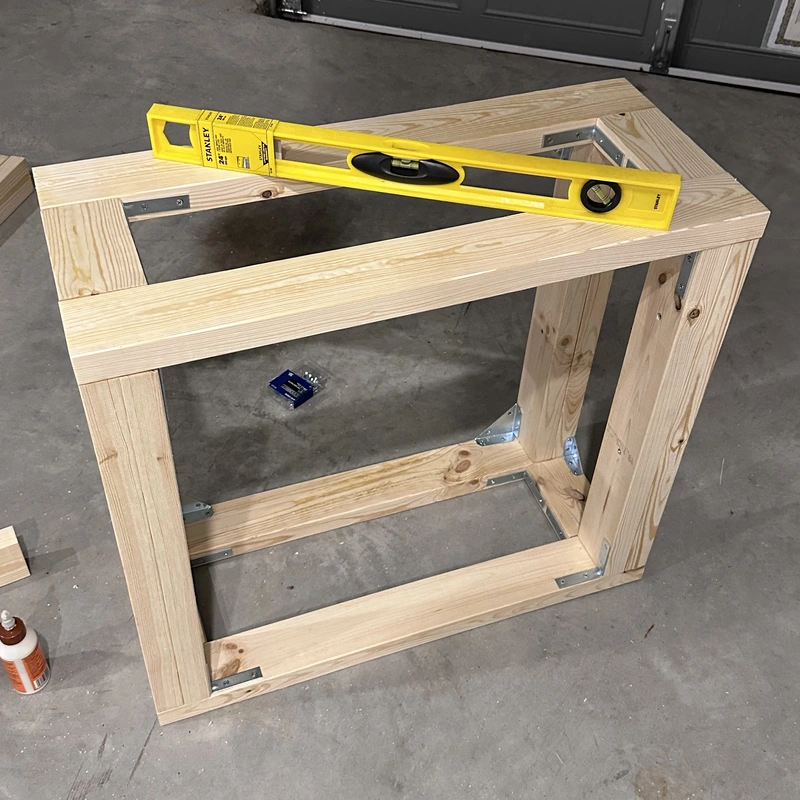
I assembled the legs by doubling up a pair of 2x4’s. Based on my research a single 2x4 can withstand thousands of pounds of vertical pressure. As these are doubled up, I’m totally unconcerned about the legs buckling.
Pilot holes make space in the wood, making it easier to drive the screw while reducing the risk of cracking. A pilot hole should be drilled using a bit-size one step smaller than the screw. Wood screws are sold with notation <#number>x<length>, where number represents some diameter. For example, I’m using #10 x 2.5” screws for these legs.

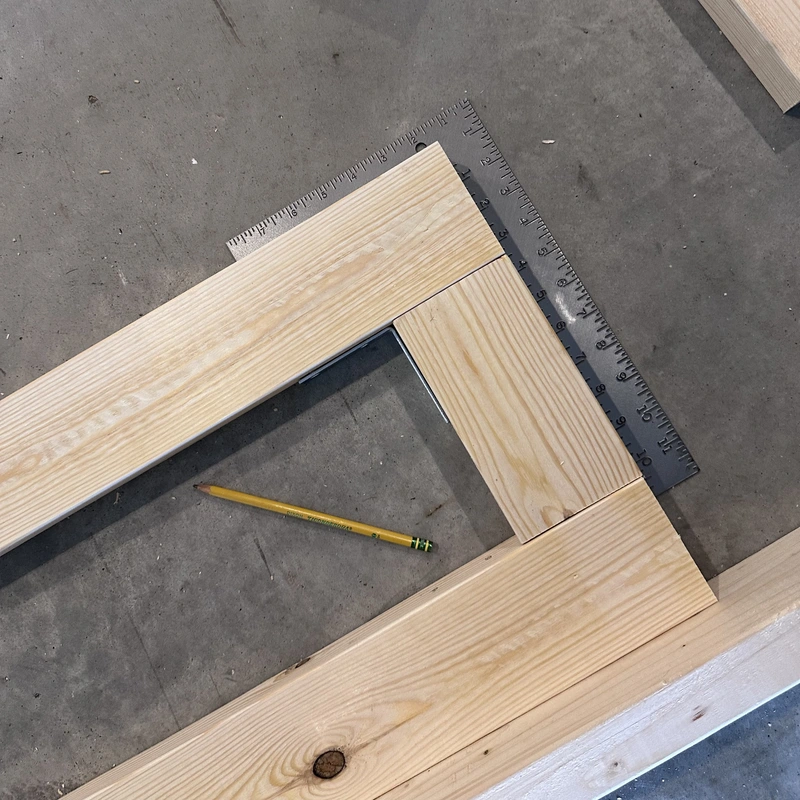
I next built the top and bottom bases, which will come into contact with the tank and the floor. The bases are sized to be approximately the same footprint as the 29-gallon display tank, but with a half-inch margin on each side to catch water drips.
The long lengths on top can apparently support over a thousand pounds distributed across their 2.5 foot lengths. The display tank might weigh around 300 lbs when full of water, so this should be sufficient.
I used a carpenter’s square to align right angles, and used the braces to stencil in locations for pilot holes. I then affixed the braces to the long ends before the short ends to leave enough room for my impact driver.
Finally, I attached the legs to the bases using some heavy duty braces. These are meant to prevent lateral or twisting movement in any direction from the base. Each brace alone should be able to hold several hundred pounds of lateral force.
I sanded the stand down with a rough 120 grit sandpaper, then again with a finer 320 grit until it felt smooth enough. I then wiped it down with a tack cloth to remove the loose wood dust.
Stains come in oil-based and water-based varieties. I opted to go with an oil-based “Golden Oak” stain. Oil-based gives off more toxic fumes until it cures, but supposedly gives richer color. Water based dries quickly without much smell, but is said to give a duller color.
I went and got a P95 respirator and got to work. It turned out slightly darker than I imagined but that’s okay. As I learned, different wood varieties receive stain differently. I will keep this in mind next time I do some staining.
Finally, I applied a polyurethane finish. I should have done thinner coats, because it took several more days for it to completely stop off-gassing.

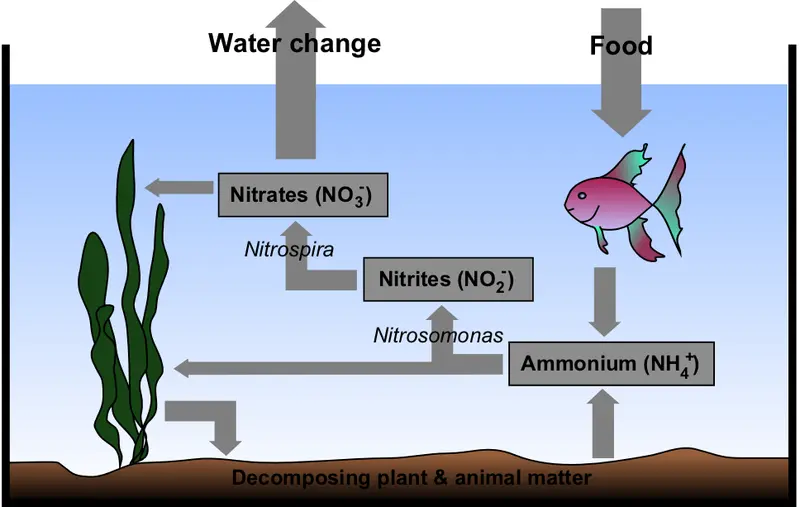
Uneaten food, fecal matter, decaying plants etc. need to be broken down as quickly as possible because they decompose into toxic ammonia. Ammonia puts fish immune systems under stress and puts them at risk of ammonia poisoning. Additionally, if waste is not removed or destroyed quickly, it becomes a breeding ground for pathogens and parasites that will eventually kill the fish later.
This is why fish die quickly in small bowls without filters. If the ammonia doesn’t kill the fish first, some disease will. This is also why fish get sick even in larger tanks with average filtration. Insufficient breakdown of waste eventually leads to disease and death.
Beneficial nitrifying bacteria ultimately metabolize waste into nitrate, a compound which fish are generally tolerant to that can be removed through water changes and plants. We can increase our beneficial bacteria capacity by increasing the tank’s surface area for it to harbor on. To have sufficient nitrifying bacterial colonies, aquarists use filters filled with dense porous media, special material which provides high amounts of surface area for good bacteria to colonize.
A sump is a style of filtration where water from a display tank flows by gravity through a pipe system into a secondary tank below which contains media. A powered pump then drives the filtered, clean water back up into the display tank. A sump’s main advantage is its size, as it can be filled with a relatively enormous amount of biological media.
The goal of this portion of the project is to create constant, reliable water circulation between the display and the sump.
Pipes can be cut to size and combined using fittings. Those relevant to this project include elbows, unions, threaded/barbed adapters, check valves, ball valves, and caps. “Socket” and “spigot” refer to female and male fittings which can be sealed into/onto each other with PVC primer and cement. Similarly, “FPT” and “MPT” refer to female and male fittings that screw into/onto each other, sealed with teflon tape. Finally, gravity is always a consideration and will affect flow rates through elevation.
Here was my final sketched design.

Since water below the gravity-fed pipe cannot drain into the sump, and since the pump flow rate does not exceed the maximum that can drain by gravity through the overflow, then neither tank can overflow unless some pipe has a blockage.
The plumbing plan all hinges on the glass not being tempered i.e. not specially treated so it won’t shatter into a million pieces the second I try to drill it. Larger tanks above 40 gallons sometimes are, and usually come with warning labels. I didn’t have any warning label on my 29.
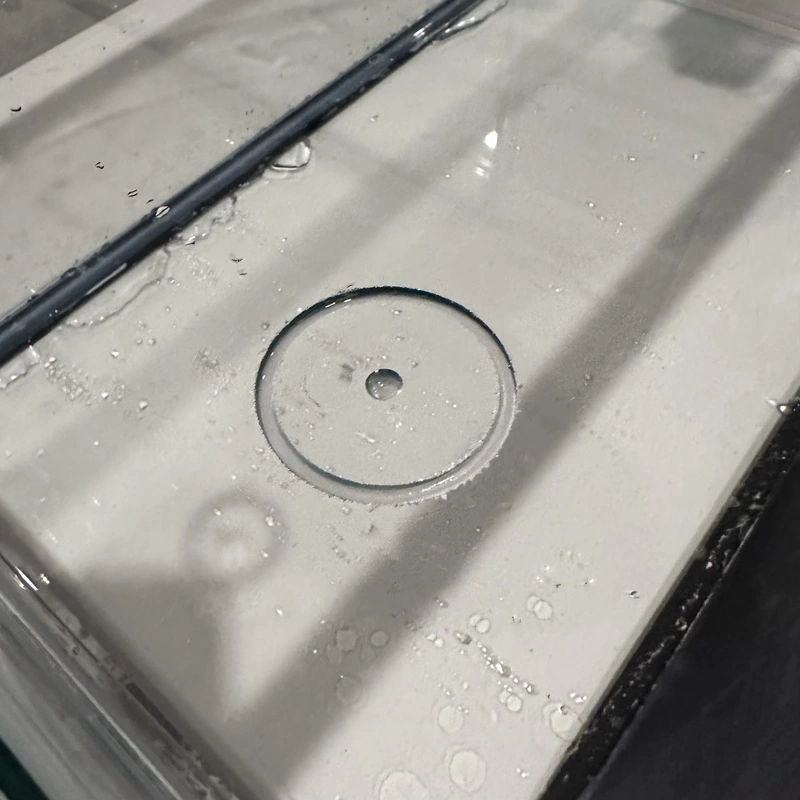
To use 1” pipes I’ll need to install a 1” bulkhead, which requires a hole diameter size of 1¾”. A common rule of thumb is to start the hole’s edges at least 100% its diameter away from any edge, to keep the glass strong. I’m drilling 150% from the edge for safety.
I picked up a 1¾” hole saw with a center-tipped glass drill bit, which made keeping the drill centered much easier. I drilled slowly and occasionally splashed some water onto my cut to keep the saw cool. I found it useful to not think of this task as drilling, instead as sanding a circle down with minimal pressure.
Fortunately, the glass was not tempered.
When I was halfway through one side, I flipped everything over and started drilling from the inside to meet the cut halfway. This made a super clean glass break without any surface chipping.
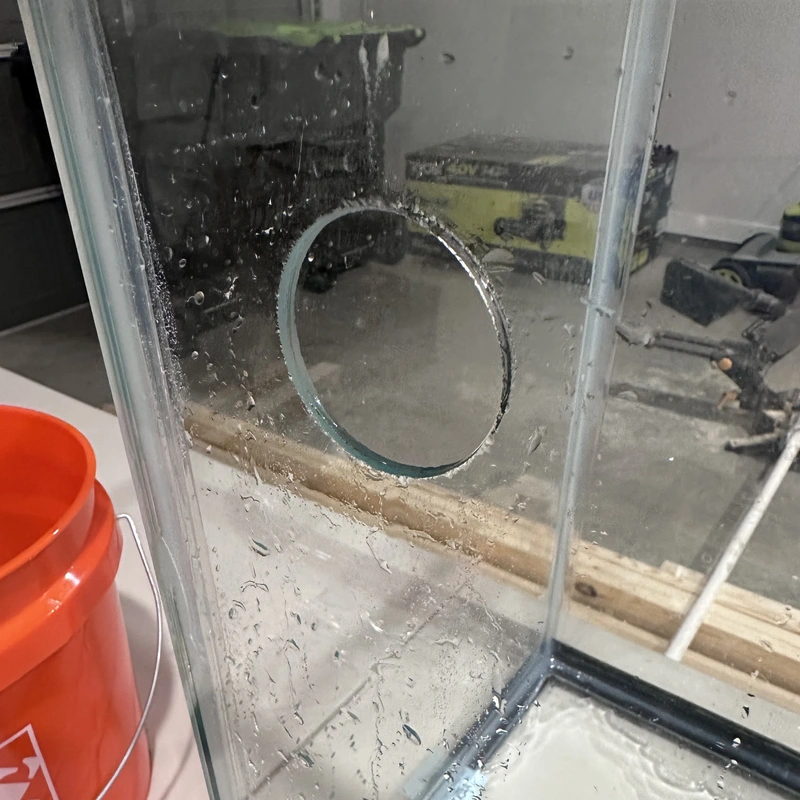
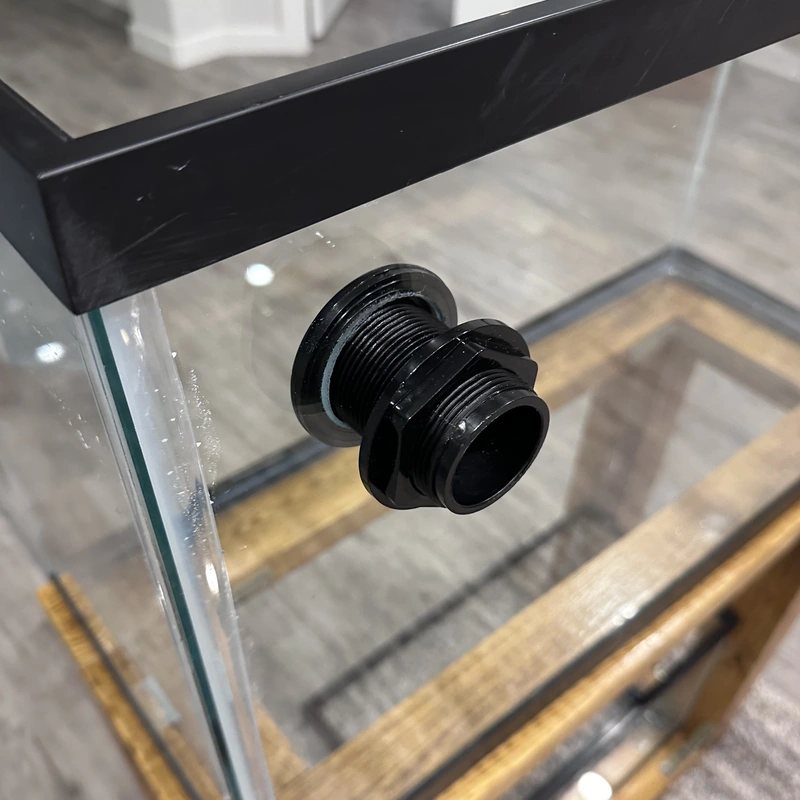
Now, I just install the bulkheads and I’m ready to get plumbing.
I took a 5 foot long 1” diameter pipe and cut it up into pieces (mostly a bunch of 2” lengths) with the miter saw. I then used PVC primer and cement to affix the fittings with those pieces.
The primer makes PVC more receptive to cement, and the cement does some chemical reaction to actually fuse PVC together.
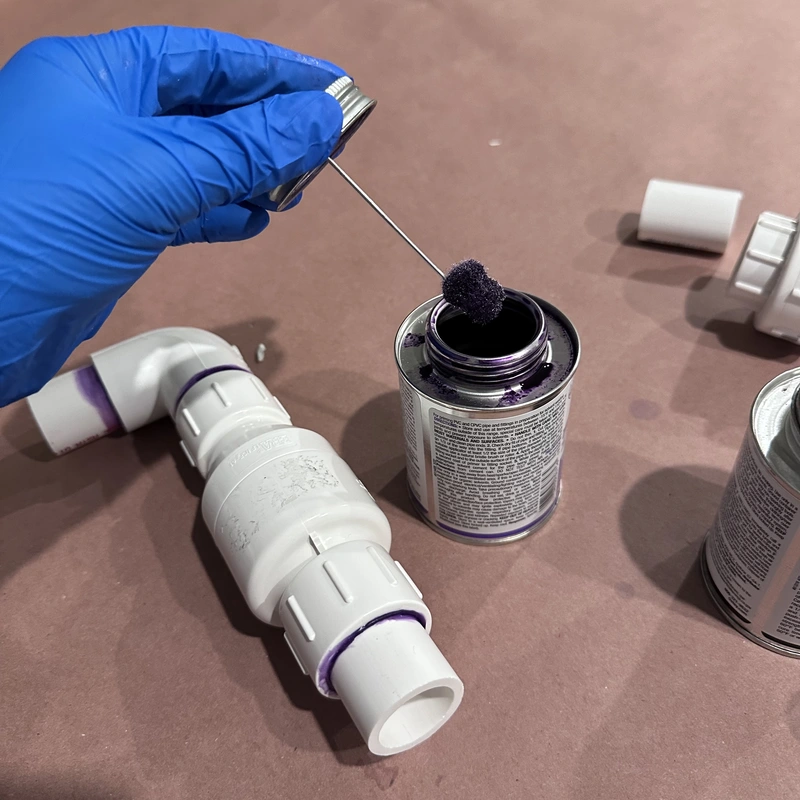
To start primer on fittings, I did an even swirling pattern around the male and female ends. Swapping to cement, repeat the swirling pattern on top of the primer. Push the ends into each other. There is a tendency for the pipe to push itself back out, so I have to hold them firmly together until the cement sets.
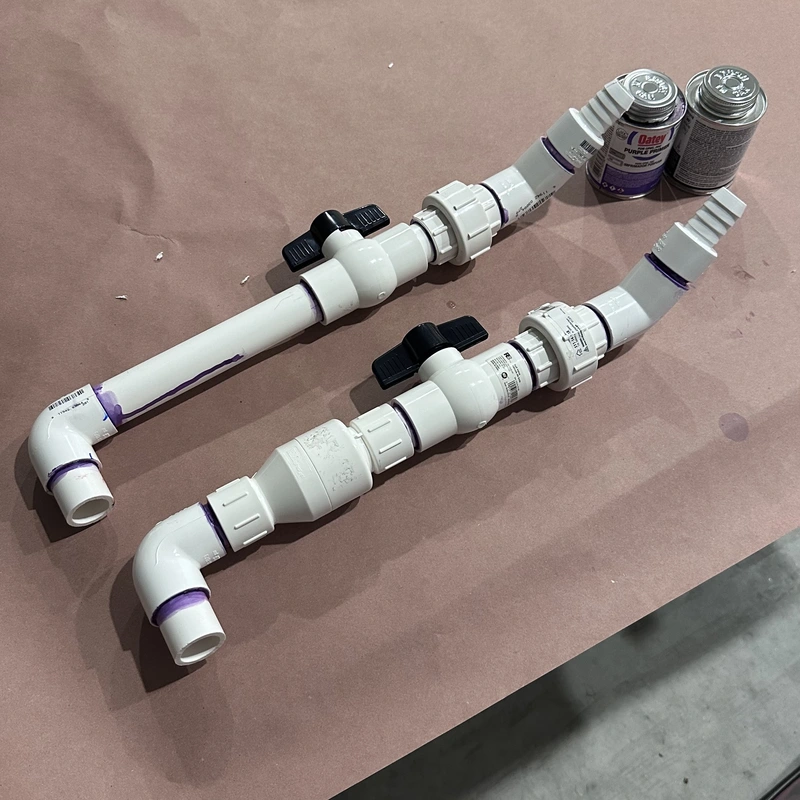
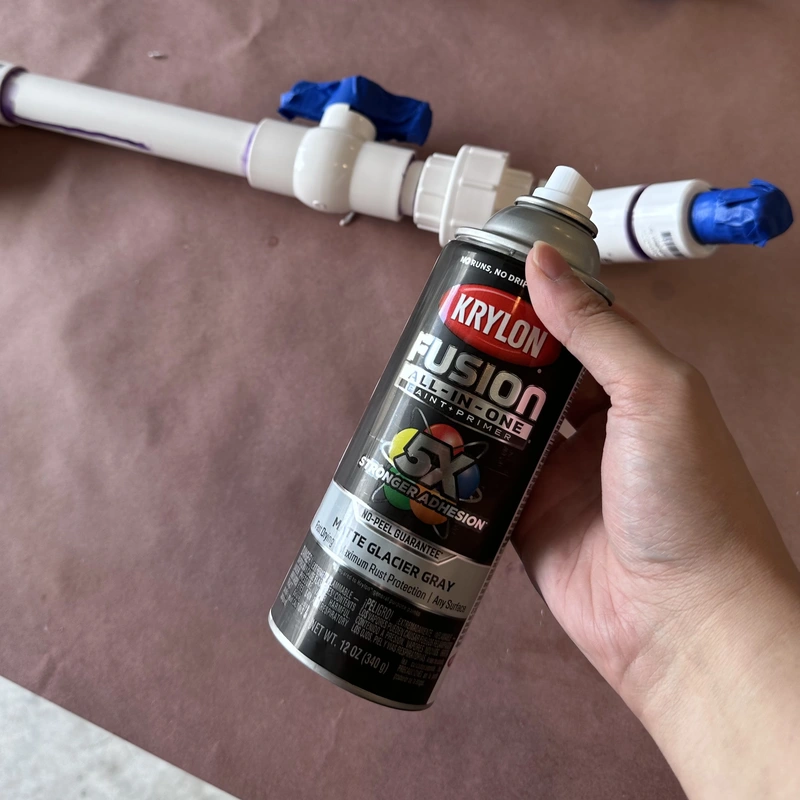
The cemented pipes look messy with the dripping purple primer and the store barcodes, so I’m spraying it lightly with Krylon Fusion, a brand of paint aquarists have historically found safe to use in fish tanks. I’m just painting it gray to camouflage it with the wall color of the room.
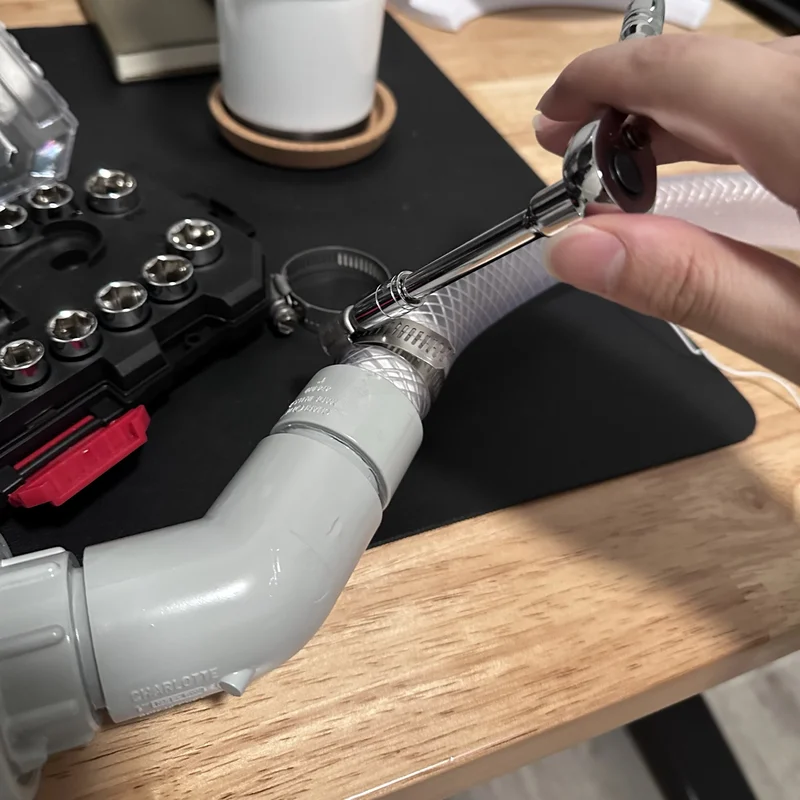
After the paint cured, I affixed 1” vinyl hoses to the barbed adapters, ratcheted tight with stainless steel clamps.
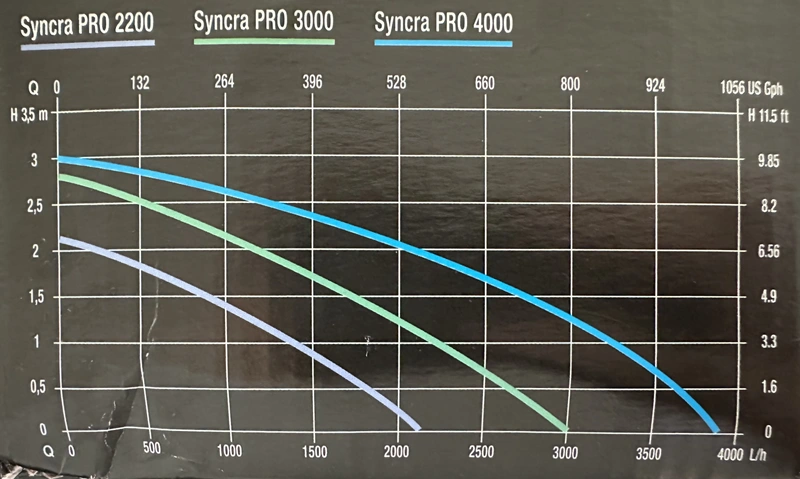
LiveAquaria.com and MarineAndReef.com both recommend circulation turnover rates of 4x the total water volume for reasons relating to filtration effectiveness and diminishing returns. To achieve 4x turnover, I need to pump my 39 gallon volume at 156 GPH.
But I can’t just go and get a 156 GPH pump. I have to consider the head height: the vertical delta from the pump to its output location. There is greater pressure on pipes at higher elevations, which will decrease a pump’s flow rate.
I need to pump water about 5 feet vertically. The Sicce Syncra Pro 2200 has an advertised flow rate of 550 GPH, but this is assumed to with zero height change. At 5’ head height, the effective flow rate is only ~200 GPH. Accounting for other possible resistance I think this should put me somewhere in the ballpark of 156 GPH. The manufacturer provides this head-height to flow rate diagram:
As water circulates, water will be drawn through a specialized aquarium filter foam which acts as surface area for nitrifying bacteria.
An ideal target for healthy fish and “crystal clear” water, as suggested by AquariumScience.com and ZipGrow.com, is 100 ft² per 1 lb of fish. This uses fish weight as a proxy measure for bioload, which isn’t perfect but serves as a decent approximation for how much food I’m going to be putting into the tank. The capacity to metabolize fish waste should be super high with this filter.

The filter sponges I’m using come in different densities, rather, porosities, measured in pores per inch. Denser porosities provide greater surface area. The plan is large matter will be caught first by the 30 ppi block, then even finer matter will be caught in the 45 ppi block.
Given my sump interior height and width measures 10x11”, I can calculate the total sponge surface area that these sponges will provide. Note I’m excluding glass, substrate, and plants from the calculation.
4 inches of 30 ppi = 4x10x11 = 440 in³
440 in³ * 36.7² / in³ ≈ 16148 in²

2 inches of 45 ppi = 2x10x11 = 220 in³
220 in³ * 40.6² / in³ ≈ 8932 in²

16148 in² + 8932 in² = 25080 in² ≈ 174 ft² total surface area
174 ft² => supports 1.74 lbs of fish
Regardless of whatever I choose to stock the tank with, I know my biofiltration can support the food eaten by an estimated 1.74 pounds (789g) of fish. This seems at least a little bit more scientific than arbitrary gallonage rules or the even worse “inches of fish” rules.
I’ll now stage the basic plumbing elements together for the first time.
I want to take disease control seriously and install a UV-C sterilizer. UV-C is a spectrum of light with germicidal properties. Its wavelengths damage the DNA or RNA of viruses, bacteria, and even parasites when exposed.
Closed inline units can be installed into plumbing systems so water will passively be exposed over a UV-C bulb. In general, higher unit wattages and longer exposure times to the bulb more effectively sterilize the water.
I’ve opted to install a Lifegard Aquastep Pro 25 Watt. The manufacturer rates it for sterilizing tanks up to 200 gallons at 760 GPH (3.8x).
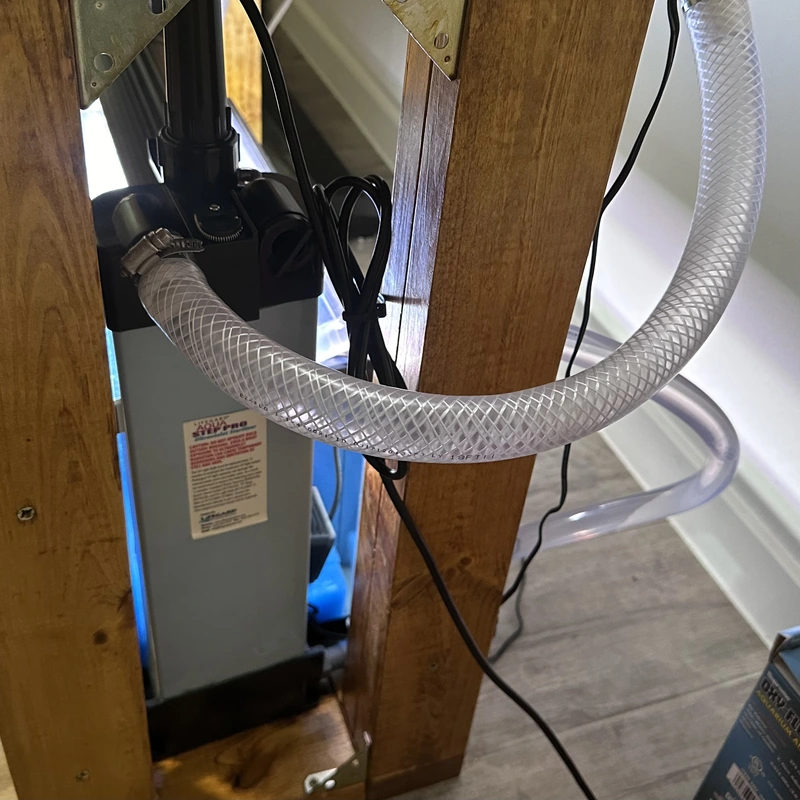
After water is pumped out of the sump, it enters the bottom of the sterilizer, flows upward in a spiral around a UV-C bulb, then back out to the PVC return pipes.
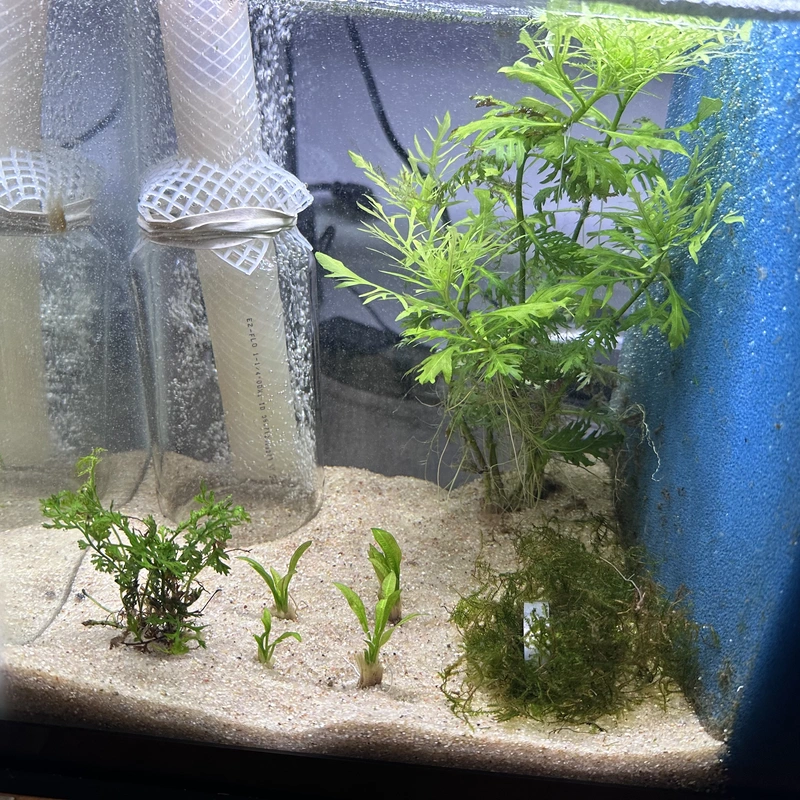
All the plumbing is done, and it’s time to start building the interior of the tanks.
I’m going to be using sand as my substrate. My choice is based on previous experience with gravel. I once had a big Oranda who I twice-witnessed choking on some of the gravel (he spat them out eventually). Gravel also has large spaces between it for uneaten food and waste to fall into, becoming insane sewer-like harbors for disease.
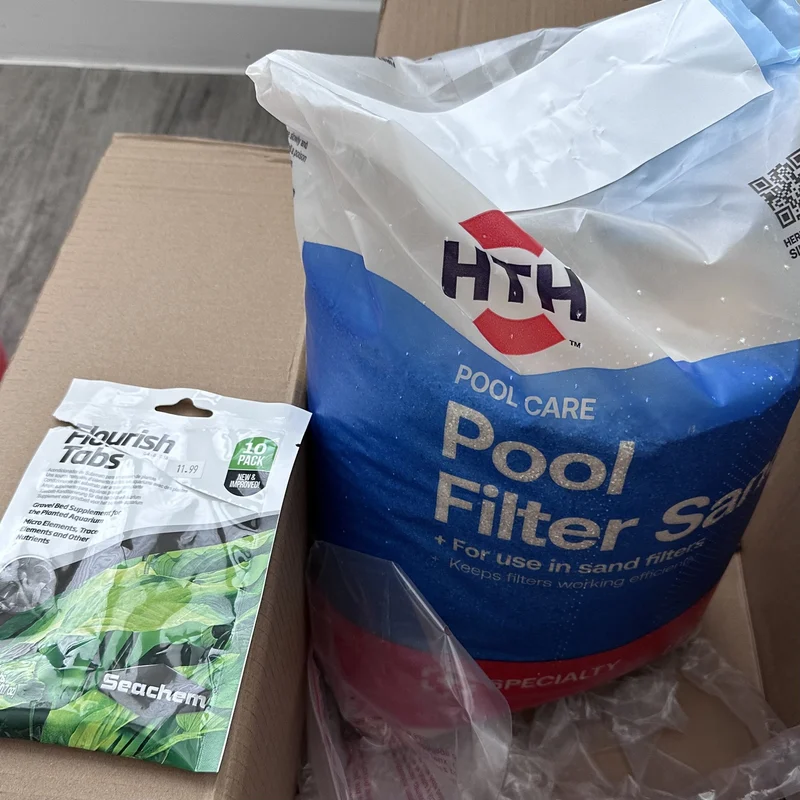
Instead of using regular aquarium store sand, I opted to use pool filter silica sand.
Pool filter sand has all the appearances of natural sand but comes at a fraction of the cost. I bought 50 lbs of sand for $9, one-tenth the cost of the same amount of sand from a pet store. Its grains are smoother than real sand, which makes it less abrasive on the digestive systems of goldfish when they inevitably swallow some of it.
The downside is pool filter sand is totally inert and devoid of nutrients for live plants. To make up for this, I’ll crush up fertilizer tabs and mix them up with the sand.
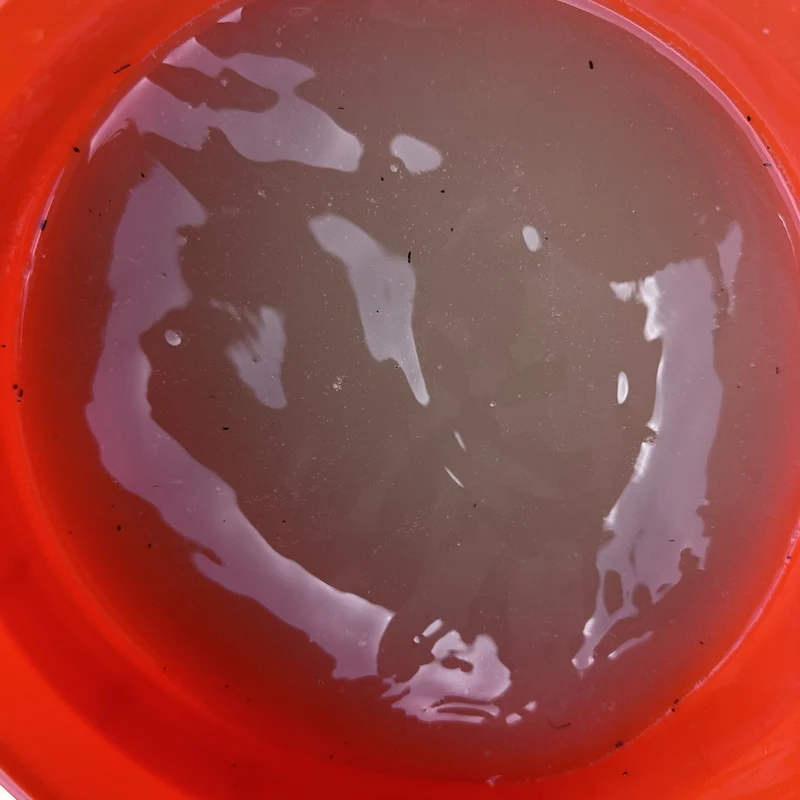
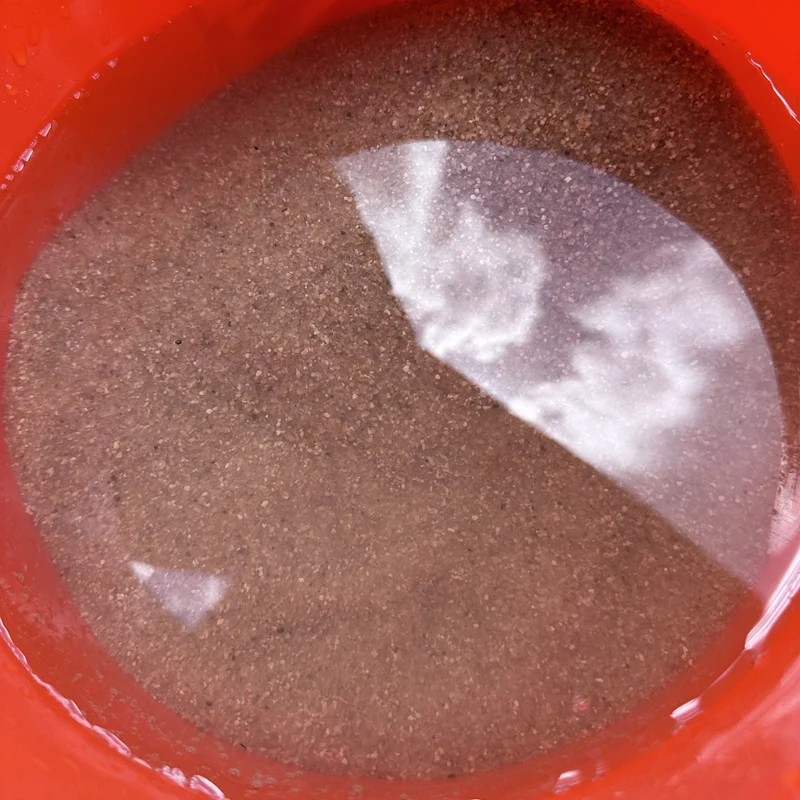
As I prepped the sand in buckets, I made sure to thoroughly rinse each batch, to reduce the amount of sand dust floating around.
I’ve kept real plants in my previous aquariums before but saw very little growth. I attribute this to my lack of knowledge about the importance of light. I never installed anything beyond pet shop low-power fluorescent lights. This time I will be sure to install real plant lights.
Plants specifically do best under red and blue light, which are absorbed by chlorophyll in photosynthesis. Chlorophyll does not use much green light and reflects it, which is why plants are usually green. I’ve never thought about it before, but greenhouse and hydroponic grow lights look pink because they are primarily only using red and blue bulbs.
As part of this build, I’m going to be installing a pair of Finnex 247 Planted+ CRV lights, which uses dedicated white, blue, red, and green LEDs. This light is programmable, so I can automate it to smoothly transition between different levels of intensity.
Live plants are an essential part of the aquarium ecosystem because they absorb ammonic fish waste as a fertilizer. Since real plants can passively consume ammonia and nitrates, they are effectively reducing the frequency of necessary water changes.
The challenging part to all this is the fish I want, fancy goldfish, are notorious plant nibblers. If they can’t chew the leaves, they are strong enough to dig up roots for fun. So plant selection must be done carefully.
There are three common submerged plant species that goldfish keepers near-universally have had success with:
I found reports of varying levels of success with some other species, among which I’m interested in trying:
In an empty space in the sump where goldfish will not be present, I will be creating a refugium which will house plant species I want to buy that likely won’t do well in the goldfish display:
I sourced my plants variously from my local fish store, a big-box pet store, and an online plant seller.
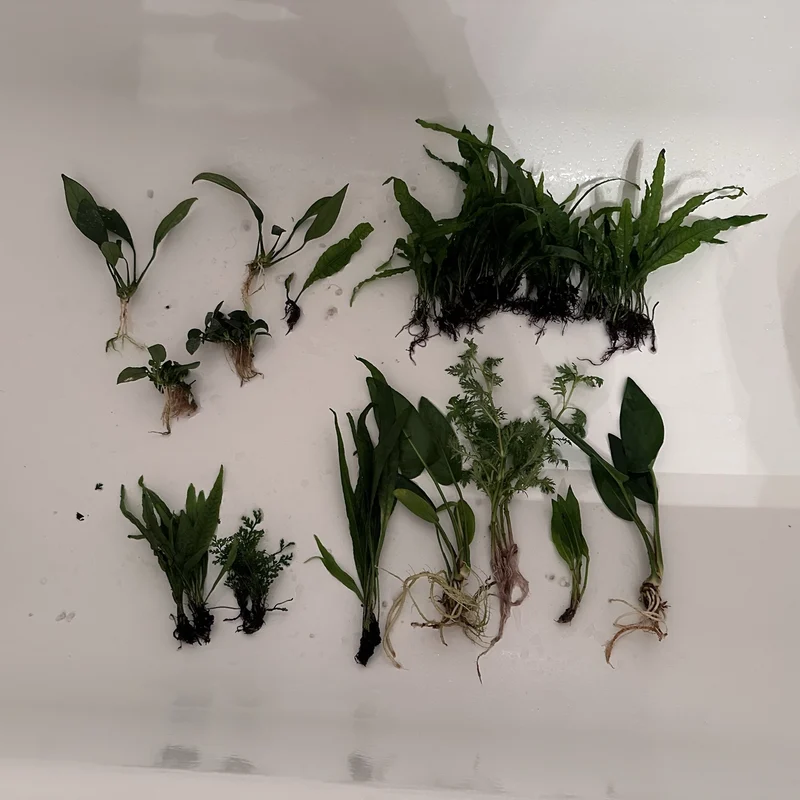

These plants are in a bathtub because I’m cleaning them with a dilute solution (1 to 20) of bleach and water. I dipped the plants in for about a minute each, in an attempt to destroy pest snail eggs that risk infesting my tank.
Fish do not respire using the oxygen within water molecules (H₂O). Fish “breathe” the same gaseous oxygen (O₂) we do, only it is dissolved in the water and extracted through their gills. This may come as a surprise, but a fish living in a small tank with no aeration will likely die by suffocation before anything else.
One way to balance the water’s oxygen saturation is by aerating it. By creating bubbles or surface rippling, we encourage gas exchange between the water’s surface and atmospheric air.

Aside from the built-in bubbling of the return pipe, I also installed an air stone behind the filter sponge, to replenish depleted oxygen after filter bacteria have used it. I’ll also install one to directly aerate the display.
The next step is mostly to wait and allow the tank to mature.
Nitrifying bacteria aren’t just immediately available. I need to let the tank mature to provide ample time for colonies to grow. If I introduced fish without them, the fish would be subjected to ammonia poisoning risk or disease caused by slow waste breakdown. For one month, I periodically added ammonium solution to the tank to simulate fish bioload.
The other reason to mature my tank is it allows the plants to acclimate alone without being nipped by fish. They will adjust to my water and their roots will take hold, making them a little harder for fish to dig up later. All of them seemed to thrive with the exception of my Amazon Swords which experienced “melting”, where their existing leaves turned brown/yellow before beginning to sprout new ones. I helped encourage new growth by trimming the browning leaves when possible.
I previously made the mistake of thinking fishkeeping was about having fish. Fishkeeping is really better described as “aquatic habitat building”, which fish happen to inhabit.
After three weeks, I took these pictures.

Two months into this project, it’s finally time to add livestock to my tank. I’m dividing the stocking up into two stages to avoid overwhelming the tank’s filter with excess ammonia.
The initial stocking includes one fancy goldfish in the display tank. My tank hangs around a temperature of 79F without a heater. Contrary to popular belief, goldfish are not exclusively coldwater fish and do well at a wide range of temperatures even higher than my tank. Actually, fancies are often bred in hot southeast Asian climates in the 80s to 90s anyway.
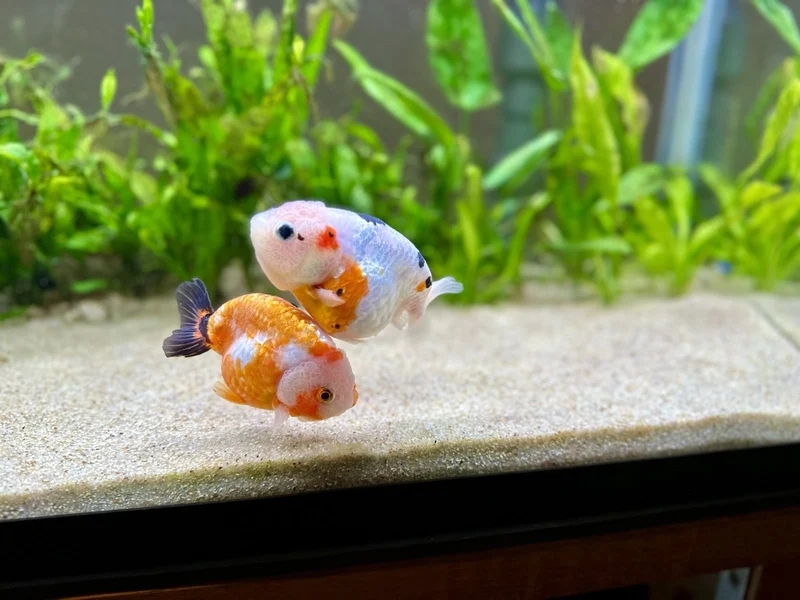
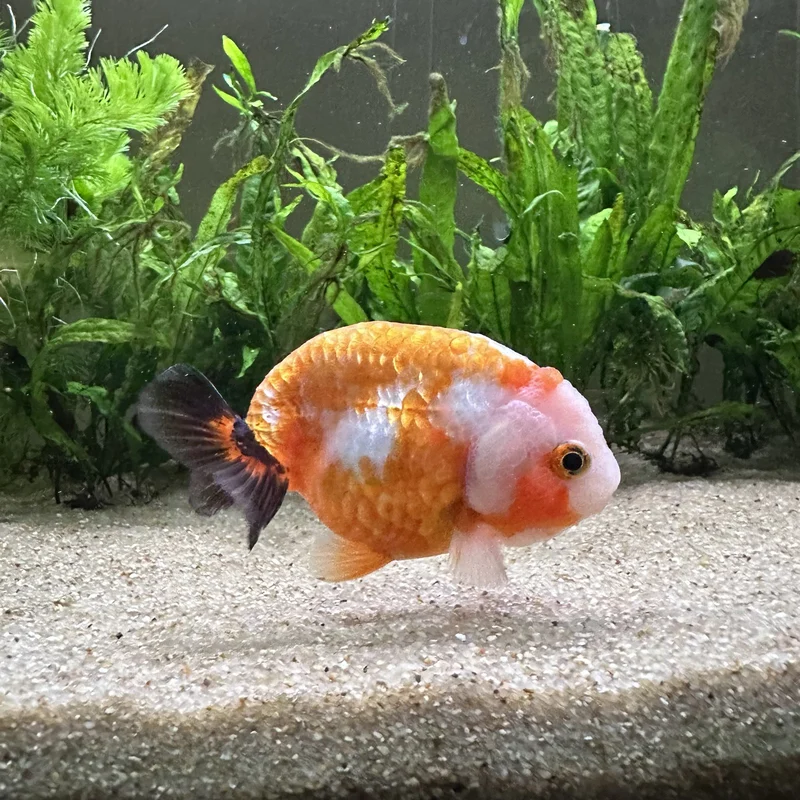
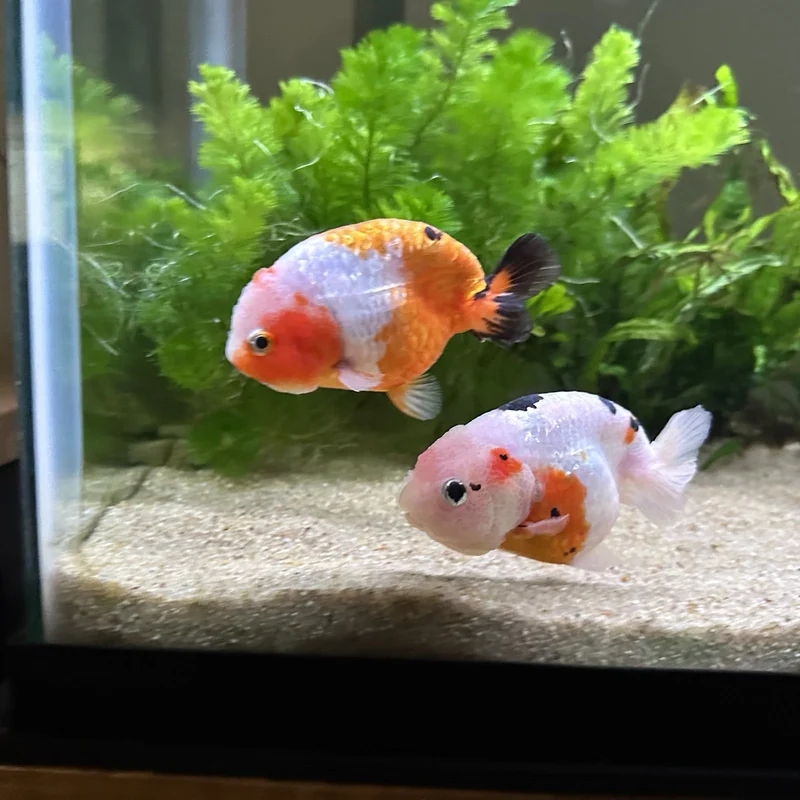
I’m especially interested in a Japanese breed called Ranchu, a breed which is known for its distinctive lack of a dorsal fin. I’ve kept fancies before for several years, but never a Ranchu, so this is new to me.
The Ranchu I purchased is a tri-color, primarily white, with small large spots of orange and black. It has a nice rounded back and a 45 degree angled tail. It’s head tissue (wen) is not super developed compared to others, but I tend to like fancy goldfish with minimal wen development. When you bring a fish home (from the store, or through the mail), you should do everything you can to prevent it from falling sick by minimizing its shock:
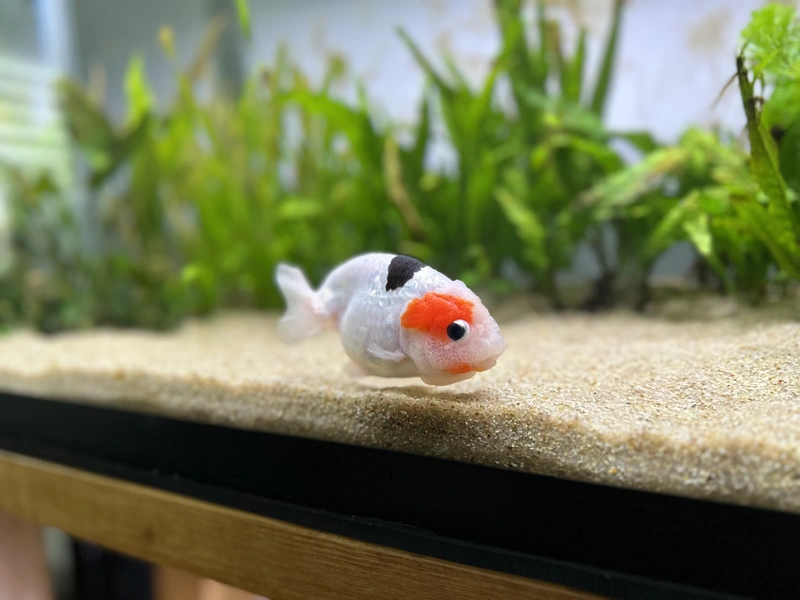
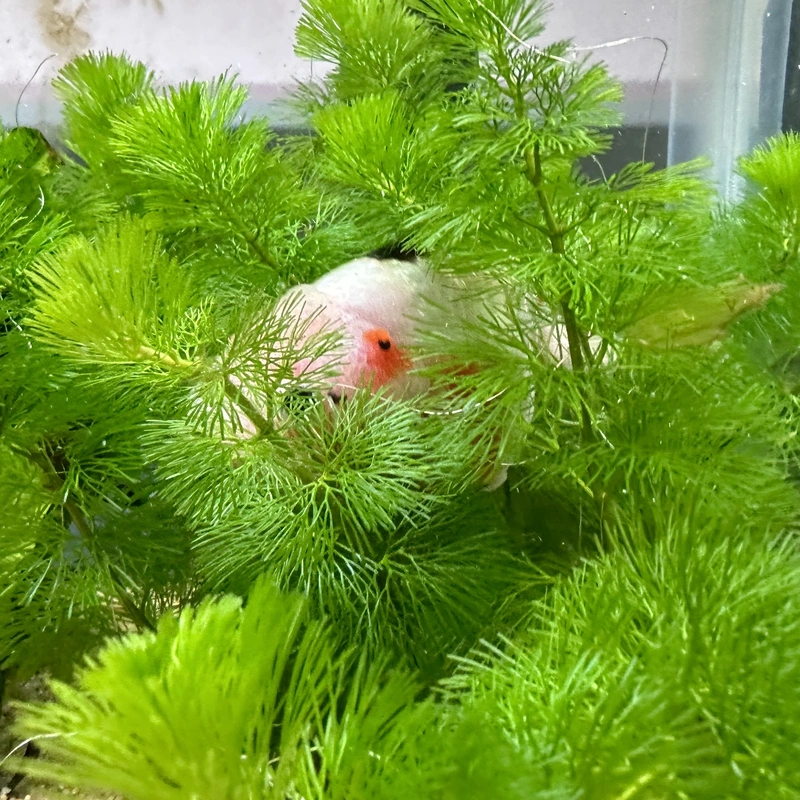
Here are some pictures I snapped of the Ranchu emerging from the Cabomba. It has notable “button” eyes. It is 11 centimeters long and weighs 84 grams. I’m 60% certain it is male.
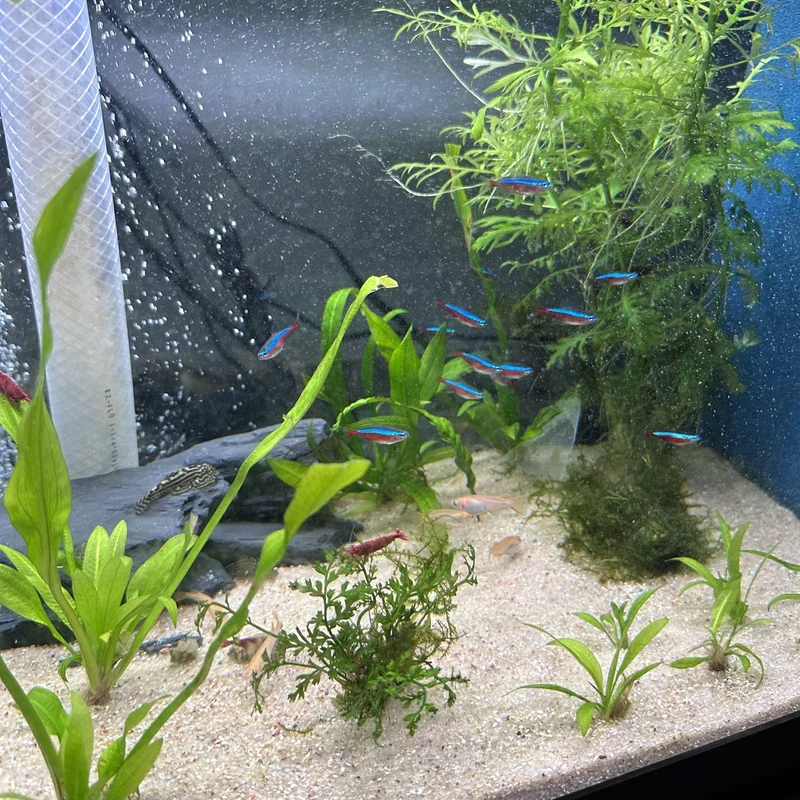
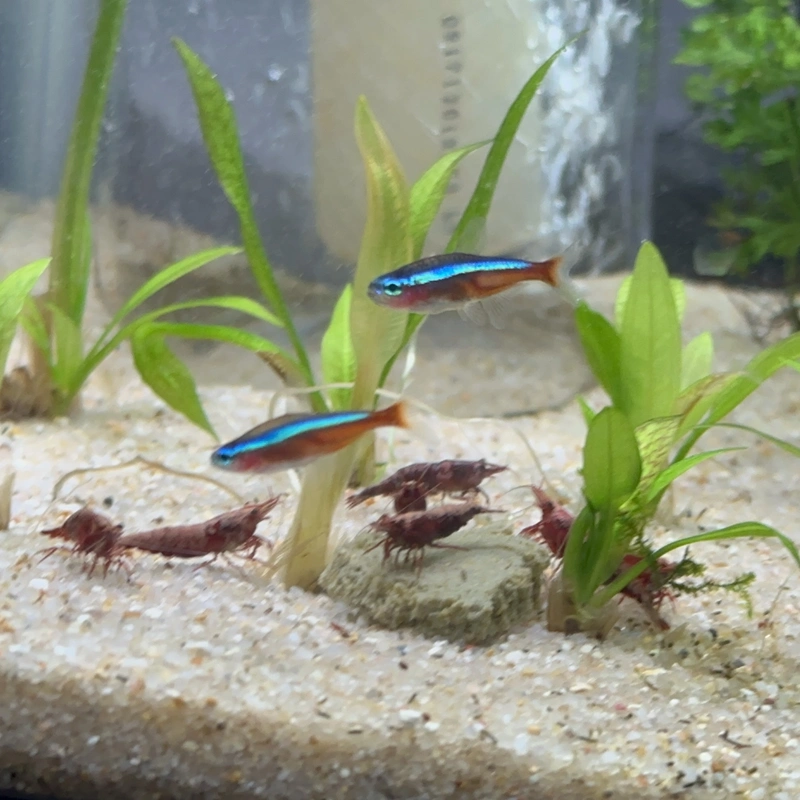
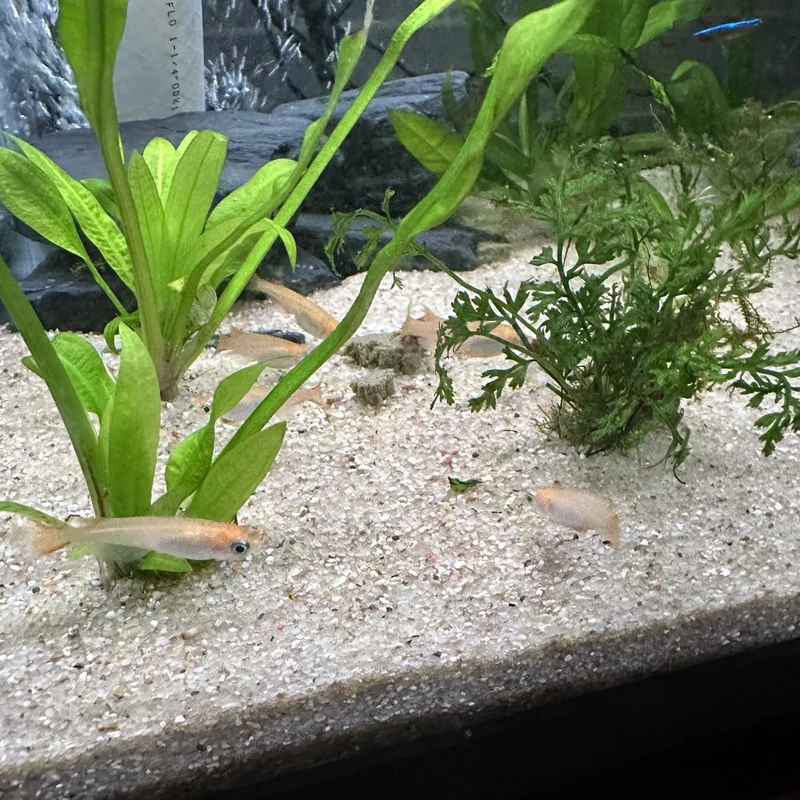
For the refugium, I’m also starting a school of seven cardinal tetras, blue and red schooling fish that grow up to 2 inches long. Most Cardinals are wild-caught, originating from acidic Amazonian waters. They should not be confused with neon tetras. Cardinals are slightly larger than the neon and have a red stripe which extends all the way from head to tail.
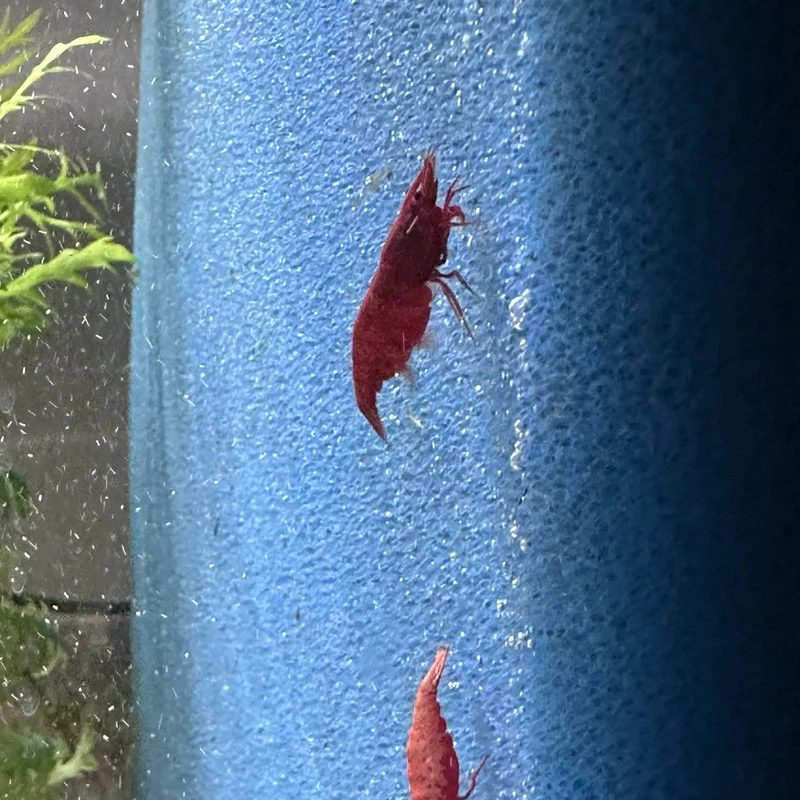
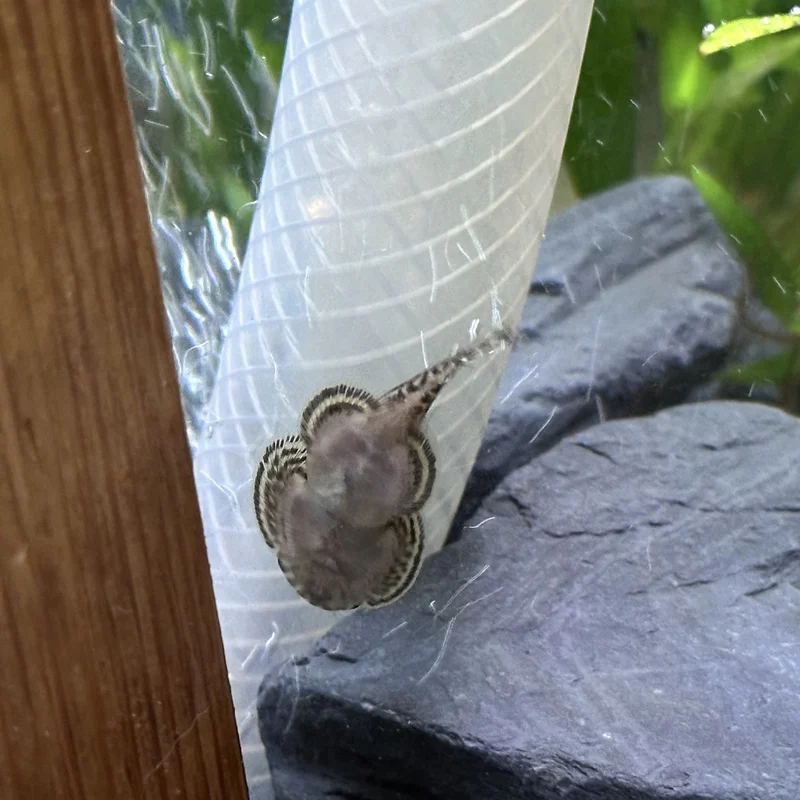
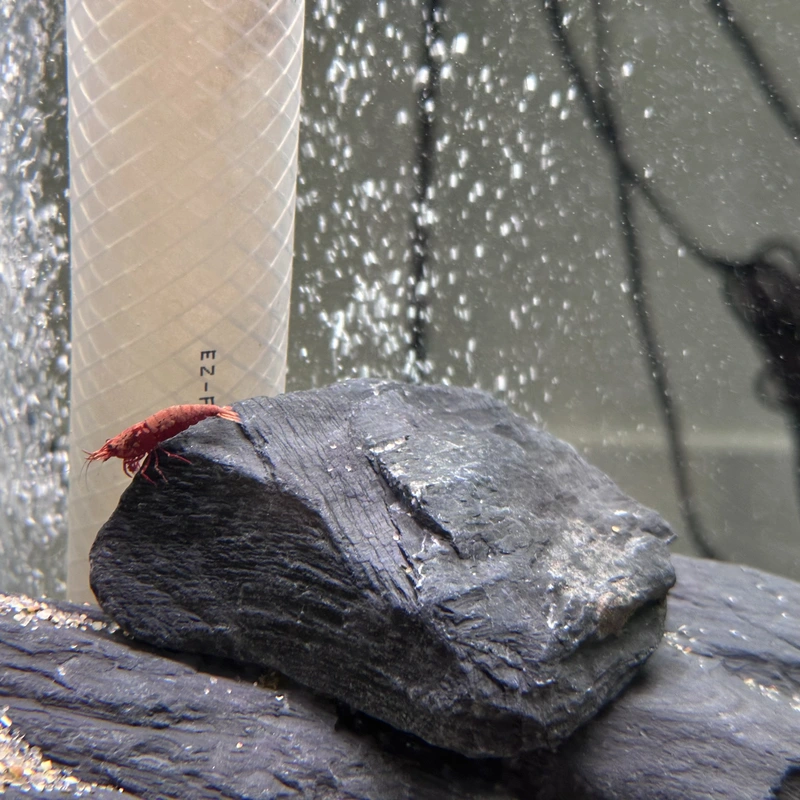
The refugium will also have a colony of ten Neocaridina shrimp. As detritivores, they are ideal cleanup residents for a sump tank which will accumulate with biofilm and other waste.
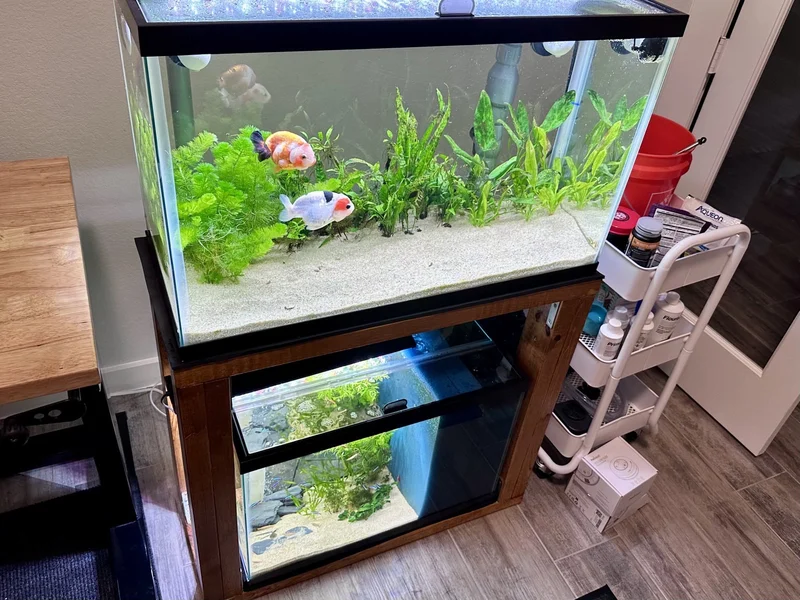
Two weeks with this initial stocking, I decided to upgrade my sump tank size from 10 gallons to 20. As a result, my total water volume increased from 39 to 49 gallons, and expanded the usable refugium volume from 5 to 14 gallons.
I didn’t have to make any major modifications except for picking up a couple more filter sponges and a new canopy. I reused everything else, including two of the original sponge blocks (which were already seeded with nitrifying bacteria), so I doubled the amount of media I had from before. The old 10 gallon will be repurposed for something else.
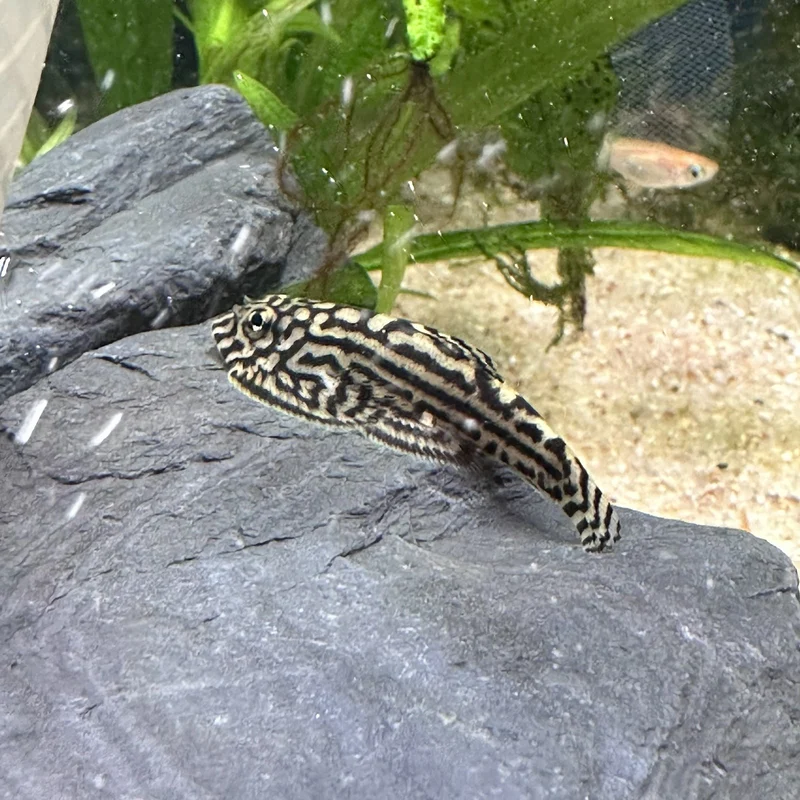
With a larger refugium volume, the second phase of my stocking added another Ranchu, 7 more cardinals, 7 ricefish, and 3 hillstream loaches.
| Species | Lives In | Count | Adult Length Each (in) | Adult Weight Each (g) |
|---|---|---|---|---|
| Ranchu Goldfish | Display | 2 | 7 | 300 |
| Cardinal Tetra | Refugium | 14 | 2 | 1 |
| Medaka Ricefish | Refugium | 7 | 2 | 1 |
| Hillstream Loach | Refugium | 3 | 3 | 3 |
| Neocaridina Shrimp | Refugium | 10 | 1 | 1 |
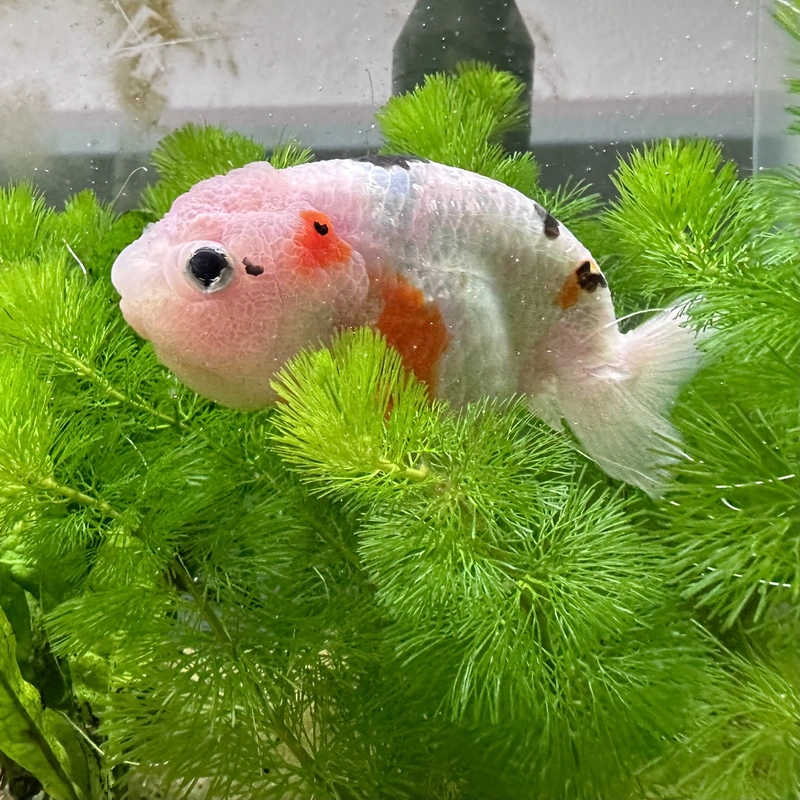
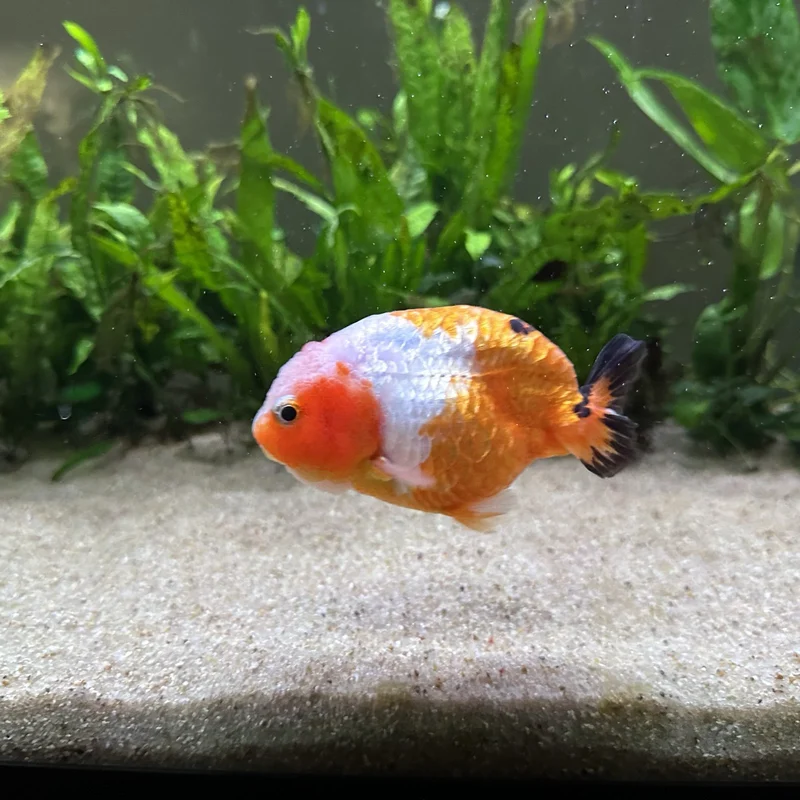
The second Ranchu is also a tri-color but with a primarily orange body and a black tail. The body shape is more rounded. I am 90% certain this one is also a male, so the pair is unlikely to breed.
I’m also doubling the number of Cardinals. I noticed occasional aggression when there were only seven of them, and I suspected that was stress due to having a small school size. After adding seven more, I confirmed that was the case because aggressive behavior completely ceased.

A new species I’m adding to the refugium is the Japanese Rice Fish. Rice fish are known for their hardiness and can tolerate an extreme range of water conditions. The particular variety I am getting is a gold/cream color.
Another new species is the hillstream loach, an algae eating fish which resemble miniature stingrays. Hillstreams require high oxygenation, and prefer high flow, which is not a problem in the refugium thanks to the return pipe. I changed out the jar at the end of the overflow hose with flat slate rocks, which the hillstreams immediately took as their home.
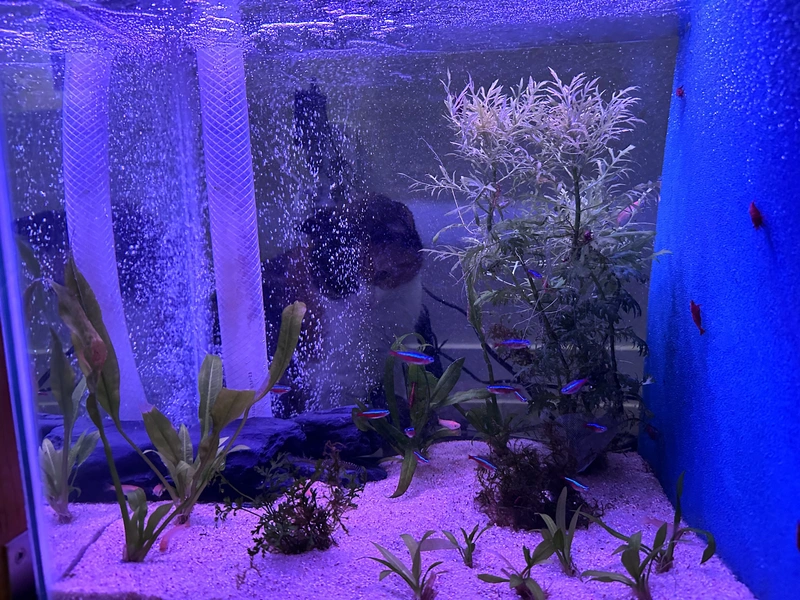
As of publication, the fish have been living here for over a month without any issues. I’ve done zero water changes so far, only topping off against evaporation with treated tap water. I just tested the water: 0 Total Ammonia (NH₃ + NH₄), 0 NO₂, 0 NO₃, 7.0 pH, 100 GH, 120 KH, 0 Cl₂. These immaculate parameters indicate that despite the bioload, the filter appears to be successfully metabolizing the ammonia and nitrite, and the plants appear to be consuming the remaining nitrate.
There is no obervable evidence of disease, and no further signs of aggression or stress.