I moved this blog away from a publicly-shared Notion site to a Cloudflare-hosted Astro site. Today I’m sharing my experience building with Astro for the first time, plus moving image hosting to Cloudflare R2.
What set Astro apart from other static site generators was, honestly, their documentation. I have no modern web framework or even SSG experience, but Astro’s hand-holding finally made sense of things like components and layouts for me.
I got started by creating a new empty Astro project with:
$ npm create astro@latest
This will create a new project directory with a sub-directory called src/ which will contain my blog’s files.
src/
	components/
	layouts/
	pages/
	styles/
Navigation component.Navigation component being imported into a BaseLayout shared by all pages.posts/ subdirectory which will contain the Markdown text of my blog posts. Markdown files can also import layouts and components.<style> tags.I will set up globally used styling, components, and layouts. These are the elements that will be used across all site pages.
In an archived GitHub repository for my old landing site (predating this blog), I’m recycling one the stylesheets I wrote several years back and importing it as styles/global.css.
Next, I’ll edit Navigation.astro and create my navigation bar:
<!-- Navigation.astro -->
---
---
<div>
	<span><a href="/">🐙 cuddle.fish 🦑</a></span>
	<span style="float: right;">
		<a href="/about">🐋 about</a> •
		<a href="/disclaimers">🦈 disclaimers</a>
	</span>
</div>
I’ll now set up a layouts/BaseLayout.astro layout, then import my styling and navigation component to it.
<Navigation /> in the body will insert the content of ../components/Navigation.astro.<slot/> represents the content of the child pages which import this layout.<!-- BaseLayout.astro -->
---
import '../styles/global.css';
import Navigation from '../components/Navigation.astro';
---
<html lang="en">
<head>
<meta charset="utf-8" />
<link rel="icon" type="image/svg+xml" href="/favicon.svg" />
<meta name="viewport" content="width=device-width" />
<meta name="generator" content={Astro.generator} />
</head>
<body>
<Navigation />
<slot/>
</body>
</html>
Going forward, I’ll set up all other pages to inherit from layouts/BaseLayout.astro.
Outside of my actual blog post content, my Notion site had three main pages: a site index (which also shows previews of my posts), an about page, and a disclaimer page.
In pages/, I’ll create one file for each (index.astro, about.astro, disclaimers.astro), formatting the content into HTML.
Each page will import my BaseLayout, causing each page to also inherit the global.css and Navigation.astro files which the base itself imported.
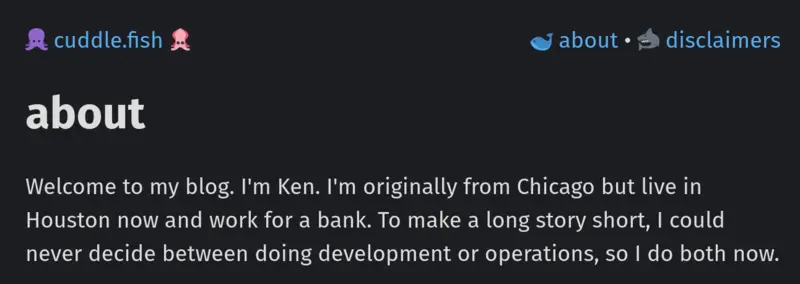
Here’s the pages/about.astro page as an example:
---
import BaseLayout from '../layouts/BaseLayout.astro';
---
<BaseLayout>
	<h1>about</h1>
	<p>Welcome to my blog. I'm Ken. I'm originally from Chicago but live in Houston now and work for a bank. To make a long story short, I could never decide between doing development or operations, so I do both now.</p>
	<p>I started this site in 2022 to document some of the projects I do in my free time. I write when I feel naturally compelled to, which so far seems to be once every few months.</p>
	<p>Technology is my "one true" hobby but I sporadically get obsessed with rotating interests like cycling and strategy/simulation/medieval games. If you want, come follow me on <a href="https://github.com/kenellorando">GitHub</a> and <a href="https://www.linkedin.com/in/kenellorando/">LinkedIn</a>.</p>
</BaseLayout>
If I start development server with npm run dev and visit localhost:4321/about, I can now see page content with inherited styling and navigation!
I can repeat the same thing for my blog index and disclaimers page, and our project is now structured with my base pages.
Notion provides the ability to export your content in multiple formats, including Markdown. I’ll go ahead and export my posts as markdown files into a pages/posts/ directory (images will be handled separately).
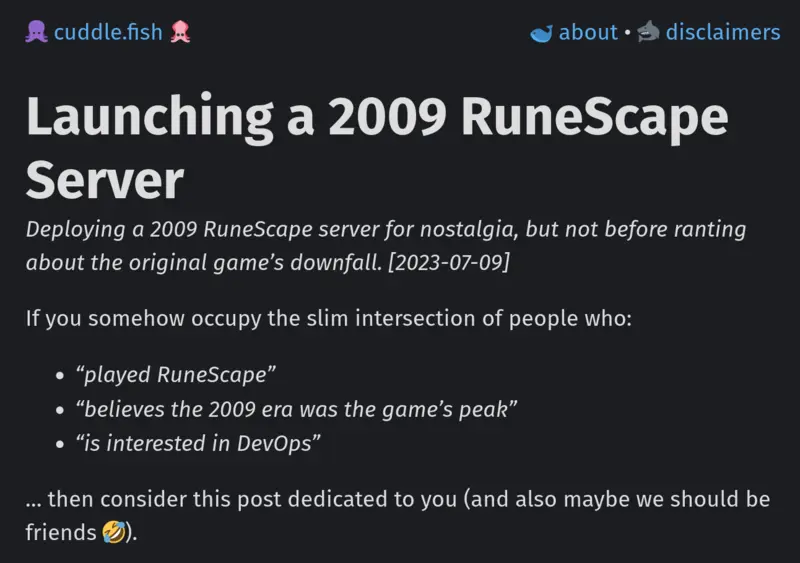
Each blog markdown file will also contain a metadata section between --- at the top. Like with my main pages earlier, importing a not-yet-created PostLayout layout, then data for title, description, and date published:
---
layout: ../../layouts/PostLayout.astro

title: 'Launching a 2009 RuneScape Server'
date: "2023-07-09"
description: "Deploying a 2009 RuneScape server for nostalgia, but not before ranting about the original game’s downfall."
---

If you somehow occupy the slim intersection of people who:

- *“played RuneScape"*
- *“believes the 2009 era was the game’s peak”*
- *“is interested in DevOps”*

... then consider this post dedicated to you (and also maybe we should be friends 🤣).
I’ll create the layouts/PostLayout.astro now. This layout will import the base layout and use the post metadata, from Astro.props, as frontmatter to create a title header, subtitle description, and publish date.
---
import BaseLayout from './BaseLayout.astro';
const { frontmatter } = Astro.props;
---
<style>
	#title {
		font-size: 43px;
		margin-bottom: 0;
	}
	#description {
		margin-top: 0;
		font-style: italic;
	}
</style>
<BaseLayout>
	<h1 id="title">{frontmatter.title}</h1>
	<div id="description">{frontmatter.description} [{frontmatter.date}]</div>
	<slot/>
</BaseLayout>
The resulting post will look like this:
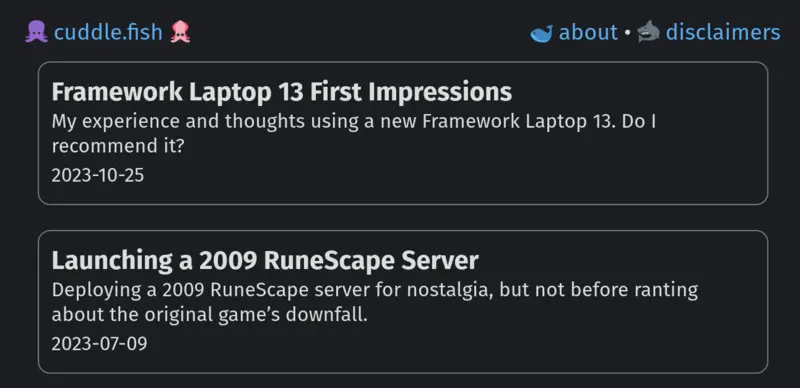
I want the index of my blog to list all of my posts in a similar way that I had it on Notion. Since each listing will have identical structure but differing data, we’ll create a reusable component.
I’ll create one more file, component/PostPreview.astro, and style a little HTML to contain the post’s metadata.
<style>
    a {
        color: inherit;
    }
    .post {
        margin: 10px;
        margin-bottom: 20px;
        padding: 10px;
        border-radius: 10px;
        border: 1px solid rgba(255, 255, 255, 0.394);
    }
    .title {
        font-weight: bold;
        font-size: 21px;
    }
    .description {
        font-size: 16px;
        line-height: 125%;
    }
    .date {
        font-size: 16px;
    }
</style>
<div class="post">
    <a href={posts.post.url}>
        <div class="title">{posts.post.frontmatter.title}</div>
        <div class="description">{posts.post.frontmatter.description}</div>
        <div class="date">{posts.post.frontmatter.date}</div>
    </a>
</div>
In index.astro, which has been empty up until now, we’ll import the BaseLayout, the PostPreview we just made, and an array allPosts which will hold the information of each the Markdown files in my posts/ directory.
For each post in allPosts, a new PostPreview will be created. Note how post={post} passes post metadata to the component.
---
import BaseLayout from '../layouts/BaseLayout.astro';
import PostPreview from '../components/PostPreview.astro';
const allPosts = (await Astro.glob('../pages/posts/*.md')).reverse();
---

<BaseLayout>
	{allPosts.map((post) => <PostPreview post={post}/>)}
</BaseLayout>
The site index now lists all of my posts:
Here’s our completed source project directory:
src/
	components/
		Navigation.astro
		PostPreview.astro
	layouts/
		BaseLayout.astro
		PostLayout.astro
		pages/
		posts/
			2022-09-25-magi.md
			2022-11-08-cadence.md
			...
		about.astro
		disclaimers.astro
		index.astro
	styles/
		global.css
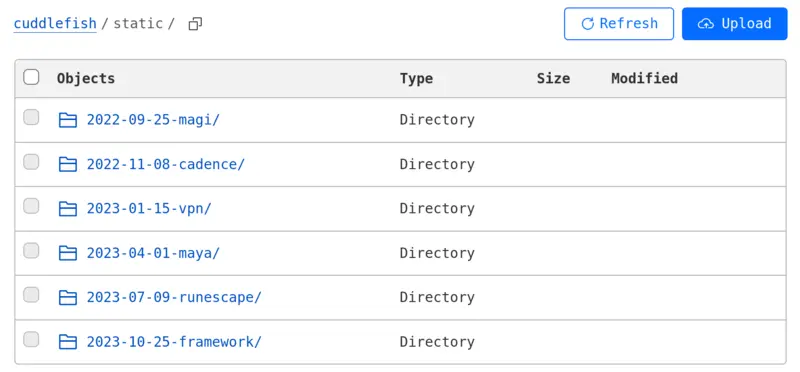
I don’t want the actual images themselves saved in my blog repository, so I’m going to use Cloudflare’s R2 object storage, then link my blog post image tags to source from it.
In a new R2 bucket, I’ve organized all post images under a static/ directory. I plan for my blog to be served under the cuddle.fish domain, so in bucket configuration I allow the funny looking subdomain i.cuddle.fish to serve bucket contents. I have to use a subdomain because we’ll be using the root domain to serve the site itself.
I’ll also mass-edit every image source link on the blog to be prefixed with https://i.cuddle.fish/static/ so images like the one below will be served directly from Cloudflare.
We’re going to finish the project by deploying it to Cloudflare Pages.
In the Cloudflare console, navigate to Workers and Pages → Pages → Connect to GitHub → select the repository → pick the “Astro” framework → Save and Deploy.
This will trigger an npm run build and push the project to a temporary URL.
18:57:48.785	23:57:48 [build] 9 page(s) built in 1.96s
18:57:48.786	23:57:48 [build] Complete!
18:57:48.825	Finished
18:57:48.825	Note: No functions dir at /functions found. Skipping.
18:57:48.825	Validating asset output directory
18:57:49.704	Deploying your site to Cloudflare's global network...
18:57:51.844	Uploading... (0/10)
18:57:52.676	Uploading... (4/10)
18:57:52.719	Uploading... (7/10)
18:57:52.859	Uploading... (10/10)
18:57:52.859	✨ Success! Uploaded 10 files (1.41 sec)
18:57:52.859
18:57:53.168	✨ Upload complete!
18:57:55.721	Success: Assets published!
Cloudflare will automatically perform the above when changes to the repository master branch are made. This is a GitOps deployment methodology where pushing/merging code is all I need to do to make it live.
My domain is already managed by Cloudflare. This makes the final step, making traffic live, simple. I’ll go back to the Pages project → custom domains → select the domain.
With that, the blog is now online at https://cuddle.fish! 🐣