I spent the past week putting together this Raspberry Pi cluster.
I’m pretty happy with the result. It’s a “plug and play” home server rack weighing about one kilogram. I can transport it anywhere, hook it to power and internet, and it will auto-run my website deployments.
I first hatched the idea after re-watching the classic 90’s anime Neon Genesis Evangelion.

The show depicts an organization which relies on a trio of supercomputers for operational decision making. The computers are named for the Biblical Magi, or the “Three Wise Men”. Of all of the things in the show, I’ve always been most intrigued by this. I’ve always wanted to have a personal computing cluster.
All anime inspiration aside, I have some actual reasons I’d like to build a home cluster:
In the context of this project, I’m trying to build a cluster that will serve as a personal home server to host things on the internet. A cluster is a group of computer nodes connected and programmed to work together. Ideally, if one node fails, the others can continue work on the task.
The applications and websites I want to host are built into containers. Containers allow us to write software and run it on other systems regardless of if the other systems have the dependencies to run it. If you wrote some code in Python, you could build the code into a container, and a computer that does not have Python installed would still be able to execute it.
Managing a single container on a server by hand might be easy, but complexity and management overhead increase fast the more you add. It’s also just not feasible to watch the container’s status 24/7, so we need some form of automation to handle this for us. Kubernetes is one such software which will manage the deployment lifecycle of containers for us. We can form a new cluster by installing a cluster software to each system.
I want my cluster to have single-node failure tolerance, where if any one node went down, the cluster as a whole would continue operating. It’s preferable to keep the cluster up in some slightly degraded state rather than completely shut down.
A control plane (or master) Kubernetes node is one which makes ultimate decisions for the cluster. In contrast, Kubernetes nodes that do not make decisions and only run workloads are called workers.
A node designated as a control plane has components installed to it which allow it to control what a worker node does. It records the state of the cluster in a database called etcd.
However, if there was only one control plane node in a cluster and it became unavailable, the rest of the cluster would become inoperable. Since I want to have single-node failure tolerance, I need a cluster with more than one master. What’s the ideal number?
When multiple control plane nodes are present, they select one amongst themselves to actually become a leader. This is necessary to prevent problems with multiple masters all making “ultimate” decisions.
When the leader goes down in a multi-master configuration, one of the other control plane nodes should notice and take over managing the cluster. The ideal number of master nodes is odd in number because a cluster will only fail if less than a majority of nodes are available. You need a majority of nodes remaining to maintain a quorum for decision making. No resilience is gained at even numbers.
To illustrate this:
| Control Plane Nodes | Majority | Max. Failure Tolerance |
|---|---|---|
| 3 | 2 | 1 |
| 4 | 3 | 1 |
| 5 | 3 | 2 |
Since I want single-node failure tolerance, I know I have to run a minimum of three control plane nodes.
Designing for single-node failure tolerance also means I need to run at least two worker nodes, in case one worker fails. To run a setup of three dedicated control plane nodes and two workers, this would require a total of five nodes.
To reduce the cost of this project I’m going to cut this number down by attempting to have each node run both master and worker processes. This means container workloads are potentially going to be assigned to the same nodes where control plane processes are running. I can keep the minimum number of master nodes to maintain failure tolerance while also forcing each node to run workloads.
We’ve covered node failure tolerance and decided on having three nodes with simultaneous master/worker duties. The next thing I want my cluster to have is a shared virtual IP.
I’m eventually going to need to send commands to the cluster’s API server, a control plane component which receives cluster administration commands.
When I connect the individual nodes to the same network, they’re each going to be assigned a unique internal IP address by my router, which poses a potential problem: what address should I be sending the API commands to?
If the nodes all have separate addresses, I would have to directly send it individually (represented below as 10.0.0.9, 10.0.0.10, or 10.0.0.11). If that one node were to become unavailable, I would need to switch sending to another node’s address.
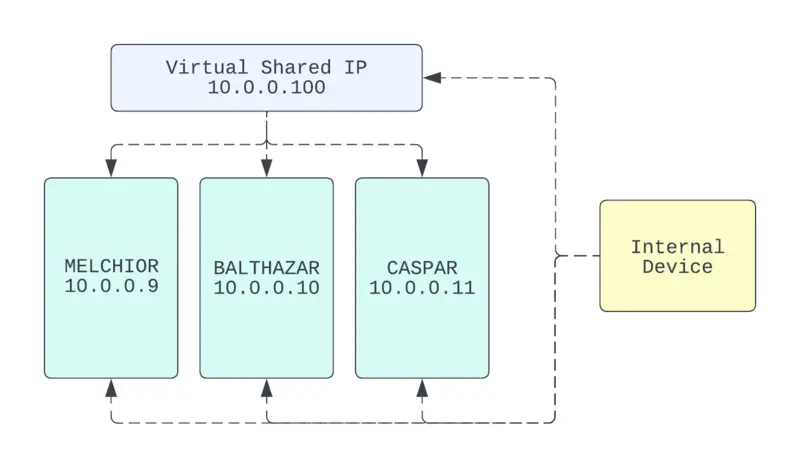
There are probably multiple ways to achieve this, but I’ll take care of this with keepalived, a Linux package which will allow the nodes in my cluster to broadcast to the network that they share one IP address.
In this setup, one node will always be an “active” receiver. If that node goes down, one of the others will automatically become the new active.
This doesn’t change any nodes’ existing IPs. It only adds an additional one to all nodes so the original internal IP can still be targeted if necessary.
In the diagram, I’m using the arbitrary virtual IP 10.0.0.100 to represent the virtual IP. As a Kubernetes master is available on all nodes, I can run administration commands by targeting the virtual IP and it should reach the cluster even if one of the nodes is down.
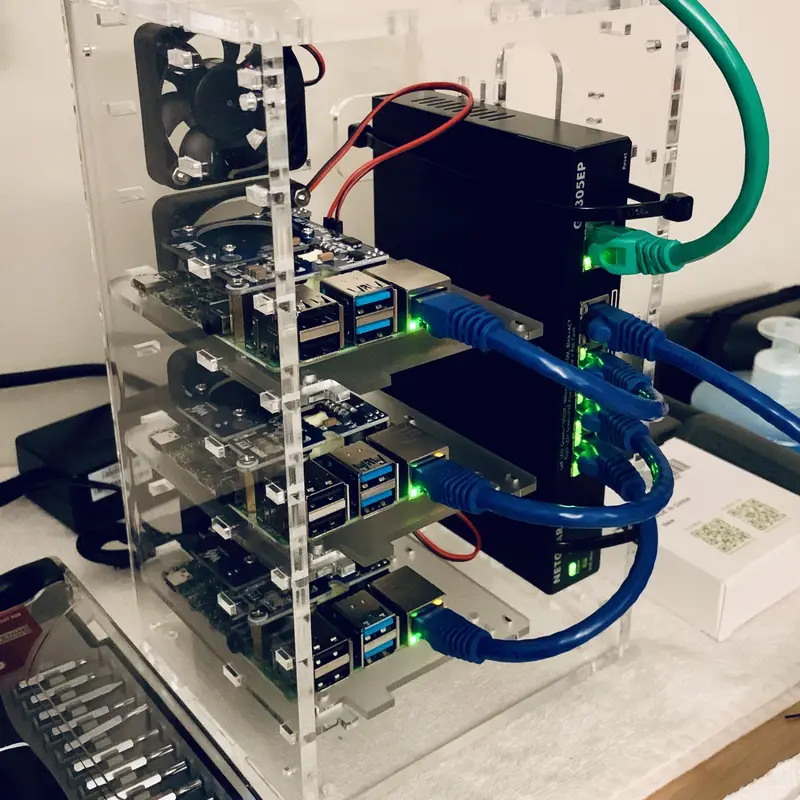
Let’s get started putting everything together.
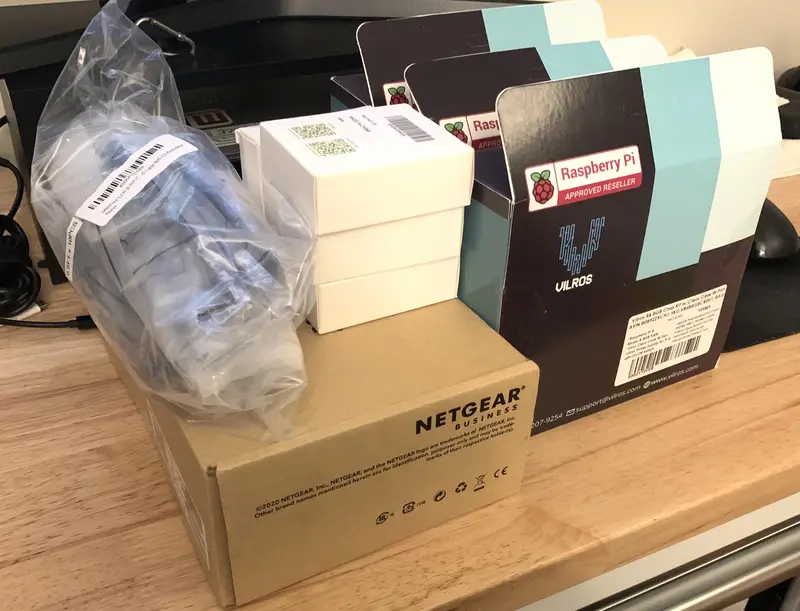
I went ahead and purchased the following:
🔊 If you were wondering, the fans from the HATs can case running at a normal load is not loud. It’s nothing close to a typical rack server. It creates a little more noise than my idle desktop computer.
Back on my laptop, I’m preparing the operating system installation.
I first obtained a Debian Linux release compatible with the Pis’ processors. I imaged the OS onto the microSD cards through using the official Raspberry Pi Imager.
Here is a useful convenience trick when installing operating systems to Raspberry Pis: Once the images are written to the micro SD, edit the sysconf text file in the root of the card. You can append a new hostname and root_authorized_key so when the node initially boots up, it will already have a name and will be immediately SSH-accessible from your device.
$ tail -n 2 sysconf
hostname=melchior
root_authorized_key=ssh-rsa AAAAAAAAAAA11111111122222222= ken@LASTORDER
I now move on to installation of systems software. This includes system utilities and the obvious required tools like Kubernetes, Docker Container Engine, and keepalived.
Since this is a repetitive task, I scripted the installation process using Ansible. If you’re unfamiliar with Ansible, it’s basically a scripting tool for doing various server administration tasks.
All of the Ansible code I used to configure the cluster is available on GitHub.
I structured the first Ansible playbook (a list of things to execute), common-config, to be called first to configure whatever I expect to be exactly the same on all nodes. This playbook will:
apt managed packages.python3. Without Python, Ansible is a glorified shell-script runner.docker-ce (the engine that allows containers to run).git, tmux, vim, netcat, and keepalived .keepalived so that all of the nodes will use the same shared IP.For Kubernetes software, I’ve opted to use K3s, a distribution that can be installed with relative ease and has releases for the arm-architecture of the Raspberry Pis.
The second Ansible playbook to run, k3s-install, initializes the cluster using two different roles (a set of specific tasks that can be embedded into a playbook):
k3s-init role only runs on only one of the three nodes. This role opens the ports required by K3s, then installs K3s, and initializes a cluster in a custom method which will make it available from the shared virtual IP address. After the cluster is finished initializing, it will output a secret token to be used by other nodes to join the cluster. The token is saved by Ansible.k3s-join role runs on the remaining two nodes. This role also opens the ports required by K3s, installs K3s, and uses the secret token from k3s-init role to join the nodes to the cluster.Before I can start managing the cluster, I need to copy any node’s /etc/rancher/k3s/k3s.yaml K3s config to my local laptop’s ~/.kube/config.
Once copied to my local machine, I just need to slightly modify this configuration so the shared keepalived virtual IP is set in the configuration file’s server. This will allow my local machine to freely use the Kubernetes control command-line tool, kubectl, and it will be sent to any of the cluster’s control plane nodes, even if one node is down.
I’m expecting to serve public web traffic over HTTPS. Earlier, I installed a Kubernetes “ingress controller” using Ansible to allow my cluster to forward external traffic to services.
As long as relevant external requests make it to the cluster, Kubernetes can pick it up from there and route the traffic to the container’s service accordingly. The last thing to do is to configure my router to forward inbound https (port 443) traffic to the shared virtual IP address.
I first want to test that when a node is disabled, pods will be replaced on different nodes. This is a basic test of automated orchestration.
I’ve deployed a basic web server container called kenellorando and configured it so there is at least one replica running on each node.
ken@LASTORDER:~$ k get nodes
NAME        STATUS      ROLES                       AGE VERSION
balthazar   Ready       control-plane,etcd,master   1d  v1.22.7+k3s1
caspar      Ready       control-plane,etcd,master   1d  v1.22.7+k3s1
melchior    Ready       control-plane,etcd,master   1d  v1.22.7+k3s1

ken@LASTORDER:~$ k get pods -n kenellorando -o=custom-columns=NAME:.metadata.name,NODE:.spec.nodeName,STATUS:.status.phase
NAME                            NODE        STATUS
kenellorando-6cbfb9f6f8-9dwzc   melchior    Running
kenellorando-6cbfb9f6f8-fbggv   balthazar   Running
kenellorando-6cbfb9f6f8-kvf44   caspar      Running
Now, I will simulate sudden failure of one of the nodes (by disconnecting its power) with the expectation that Kubernetes will notice and relaunch the pod onto one of the working systems. I disconnect balthazar and observe that melchior has launched a new one in response.
ken@LASTORDER:~$ k get nodes
NAME        STATUS      ROLES                       AGE VERSION
balthazar   NotReady    control-plane,etcd,master   1d  v1.22.7+k3s1
caspar      Ready       control-plane,etcd,master   1d  v1.22.7+k3s1
melchior    Ready       control-plane,etcd,master   1d  v1.22.7+k3s1

ken@LASTORDER:~$ k get pods -n kenellorando -o=custom-columns=NAME:.metadata.name,NODE:.spec.nodeName,STATUS:.status.phase
NAME                            NODE        STATUS
kenellorando-6cbfb9f6f8-268d5   melchior    Running
kenellorando-6cbfb9f6f8-9dwzc   melchior    Running
kenellorando-6cbfb9f6f8-kvf44   caspar      Running
I next want to test that the cluster will continue operating when the leader goes down.
Recall that all of the nodes are masters, but only one among them is an elected leader. My expectation is once the leader disappears, the others will notice and one of them will take over managing the cluster.
In full K8s, here’s a “proper” way to identify which node is currently the leader (check the Annotations of kubectl describe endpoints -n kube-system). However, this annotation does not appear to be available in my K3s installation.
I will work around that by checking that some leader has assumed control simply by checking that everything still works in each possible one-node down state. This will simultaneously verify that virtual shared-IP failover works too, because we’ll be testing that kubectl works on the cluster virtual IP (my kubectl installation is targeting the virtual IP 10.0.0.100 for all tests).
The last test already demonstrated that the cluster works with balthazar down. Now I’ll just repeat the disconnect on the other nodes:
ken@LASTORDER:~$ k get nodes
NAME        STATUS      ROLES                       AGE VERSION
balthazar   Ready       control-plane,etcd,master   1d  v1.22.7+k3s1
caspar      Ready       control-plane,etcd,master   1d  v1.22.7+k3s1
melchior    NotReady    control-plane,etcd,master   1d  v1.22.7+k3s1

ken@LASTORDER:~$ k get pods -n kenellorando -o=custom-columns=NAME:.metadata.name,NODE:.spec.nodeName,STATUS:.status.phase
NAME                            NODE        STATUS
kenellorando-6cbfb9f6f8-47k2z   balthazar   Running
kenellorando-6cbfb9f6f8-fgzns   balthazar   Running
kenellorando-6cbfb9f6f8-kvf44   caspar      Running
…
ken@LASTORDER:~$ k get nodes
NAME        STATUS      ROLES                       AGE VERSION
balthazar   Ready       control-plane,etcd,master   1d  v1.22.7+k3s1
caspar      NotReady    control-plane,etcd,master   1d  v1.22.7+k3s1
melchior    Ready       control-plane,etcd,master   1d  v1.22.7+k3s1

ken@LASTORDER:~$ k get pods -n kenellorando -o=custom-columns=NAME:.metadata.name,NODE:.spec.nodeName,STATUS:.status.phase
NAME                            NODE        STATUS
kenellorando-6cbfb9f6f8-268d5   melchior    Running
kenellorando-6cbfb9f6f8-47k2z   balthazar   Running
kenellorando-6cbfb9f6f8-fgzns   balthazar   Running
This demonstrates that the cluster continues to operate with any one-node down, implying that leader assumption must be working and that keepalived is automatically reassigning “active” nodes.
So everything works.
| Item | USD (inc. sales tax) |
|---|---|
| 3x Vilros Raspberry Pi 4 8GB | $478.26 |
| C4Labs Cloudlet Case | $102.64 |
| iMBAPrice 6in Cat6 Patch Cables | $15.28 |
| NETGEAR 5port PoE GBit Switch | $54.59 |
| 3x waveshare PoE HAT for RPi 4B | $77.61 |
The system build total was $728.38.
I originally made these purchases when the electronic component supply chain was only starting to become busted and Raspberry Pis were still somewhat available.
Raspberry Pis are basically unobtainable today (September 2022). A single kit similar to the ones I purchased will likely cost over $300 now.
Assuming each node runs 24/7 at 100% load, while also powering peripheral case fans, the three nodes use 13.31 kWh in one month (Raspberry Pi Power Calculator). At the average US electricity price of $0.139/kWh this is $1.85/month.
Suppose I went to AWS and launched a less powerful single-node t3.medium ($30.37/mo) EKS cluster ($73.00/mo), with a single classic load balancer ($18.25/mo) and a single NAT gateway ($32.85/mo). To be even more biased for AWS, we’ll assume no charges for any data transfer or instance storage.
This still amounts to $154.47 per month. Even under this scenario, my cluster pays for itself every 4.8 months. Not bad, I think.
Estimate by AWS: https://calculator.aws/#/estimate
I truly had a lot of fun doing this. Knowing the apps I’m building are also running on an infrastructure of my own design and build gives me a sense of satisfaction. I’m already using the cluster to run things like https://cadenceradio.com. I’m excited to deep dive into more Kubernetes tech too.
Thanks for reading!